crwdns2933423:0crwdne2933423:0

ディスプレイアセンブリ(ブラケット)

crwdns2931529:0crwdnd2931529:0crwdnd2931529:0crwdnd2931529:02crwdnd2931529:0crwdne2931529:0

crwdns2936315:0crwdne2936315:0
crwdns2936323:0crwdne2936323:0
crwdns2931653:023crwdne2931653:0
Display Assembly (Bracket), Lift the display: crwdns2935265:00crwdnd2935265:01crwdnd2935265:03crwdne2935265:0 Display Assembly (Bracket), Lift the display: crwdns2935265:00crwdnd2935265:02crwdnd2935265:03crwdne2935265:0 Display Assembly (Bracket), Lift the display: crwdns2935265:00crwdnd2935265:03crwdnd2935265:03crwdne2935265:0
Lift the display
  • The iPad shown in the following two steps is the iPad Pro 12.9" 1st Generation. The internals look slightly different but the taping procedure is the same.

  • The display cables in this iPad are very short. Read the next two steps before you proceed.

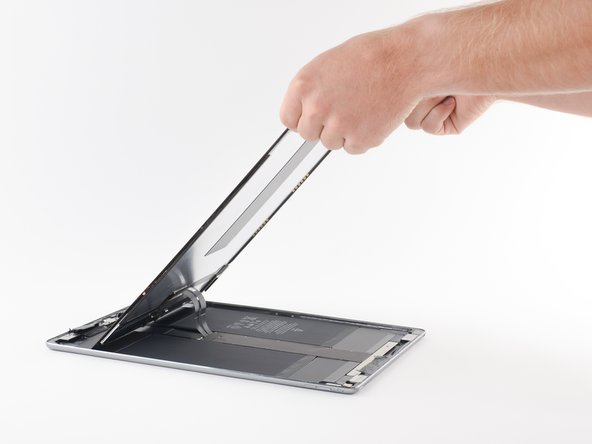
  • Do not pivot the screen about the lower edge. The display cables don't have enough slack to allow for this and will tear if you do not slide the screen towards the front-facing camera as you lift.

  • The display cables will tear if you raise the screen more than 90º.

  • Lift up the upper edge of the screen and slide the entire screen towards the front-facing camera to access the iPad's internal components.

  • Use masking tape to tape the lower edge of the screen to the frame to prevent the screen from slipping.

以下の2つのステップで紹介するiPadは、iPad Pro 12.9インチ第1世代です。内部は若干異なりますが、テーピングの手順は同じです。

このiPadのディスプレイケーブルは非常に短いです。先に進む前に次の2つの手順をよく読んでください。

スクリーンを下端付近で回転させないでください。ディスプレイケーブルには十分な弛みがないため、スクリーンを前面カメラ側にスライドさせながら持ち上げないと破れます。

スクリーンを90°以上上げると、ディスプレイケーブルが破れます。

スクリーンの上端を持ち上げ、スクリーン全体を前面カメラに向かってスライドさせると、iPadの内部パーツにアクセスできます。

スクリーンがスリップしないように、スクリーンの下端をマスキングテープでフレームに貼り付けます。

crwdns2944171:0crwdnd2944171:0crwdnd2944171:0crwdnd2944171:0crwdne2944171:0