crwdns2933423:0crwdne2933423:0

ディスプレイアセンブリ(ブラケット)

crwdns2931529:0crwdnd2931529:0crwdnd2931529:0crwdnd2931529:02crwdnd2931529:0crwdne2931529:0

crwdns2936315:0crwdne2936315:0
crwdns2936323:0crwdne2936323:0
crwdns2931653:09crwdne2931653:0
Display Assembly (Bracket), Slice the adhesive: crwdns2935265:00crwdnd2935265:01crwdnd2935265:03crwdne2935265:0 Display Assembly (Bracket), Slice the adhesive: crwdns2935265:00crwdnd2935265:02crwdnd2935265:03crwdne2935265:0 Display Assembly (Bracket), Slice the adhesive: crwdns2935265:00crwdnd2935265:03crwdnd2935265:03crwdne2935265:0
Slice the adhesive
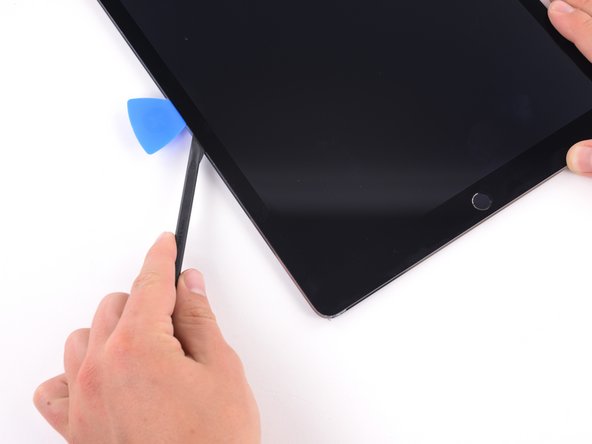
  • Reapply the iOpener to the bottom left corner of the iPad for at least 2 minutes, spanning from the opening pick to the home button.

  • After letting the adhesive soften, insert an opening pick or halberd spudger into the gap next to the opening pick.

  • Don't insert your slicing tool deeper than 3–4 mm, or you risk permanently damaging the display panel.

  • Use an opening pick or halberd spudger to slice the adhesive along the bottom left side of the iPad. If the slicing becomes difficult, reheat the edge and try again.

温めたiOpenerをiPadの左下隅に、オープニングピックからホームボタンまで少なくとも2分間当てます。

接着剤が柔らかくなったら、オープニングピックまたはハルバードスパッジャーをオープニングピックの横の隙間に差し込みます。

スライスツールを3~4mm以上深く挿入しないでください。

オープニングピックまたはハルバースパッジャーを使って、iPadの左下に沿って接着剤をスライスします。切開作業が困難になった場合は、エッジを再加熱して再試行してください。

crwdns2944171:0crwdnd2944171:0crwdnd2944171:0crwdnd2944171:0crwdne2944171:0