crwdns2933423:0crwdne2933423:0

Gruppo del display

crwdns2931529:0crwdnd2931529:0crwdnd2931529:0crwdnd2931529:02crwdnd2931529:0crwdne2931529:0

crwdns2936315:0crwdne2936315:0
crwdns2936321:0crwdne2936321:0
crwdns2931653:026crwdne2931653:0
Display Assembly (Unfasten), Remove the logic board EMI shield: crwdns2935265:00crwdnd2935265:01crwdnd2935265:03crwdne2935265:0 Display Assembly (Unfasten), Remove the logic board EMI shield: crwdns2935265:00crwdnd2935265:02crwdnd2935265:03crwdne2935265:0 Display Assembly (Unfasten), Remove the logic board EMI shield: crwdns2935265:00crwdnd2935265:03crwdnd2935265:03crwdne2935265:0
Remove the logic board EMI shield
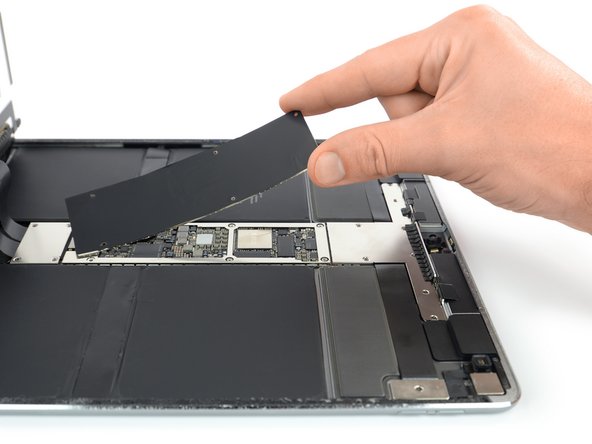
  • Lift the logic board EMI shield from the edge nearest the top of the iPad.

  • Peel up the EMI shield from the logic board.

  • This takes a bit of force due to the many tiny clips securing the shield, and the shield may deform slightly. That's okay—try to keep the deformation to a minimum, and it will lay flat when you reinstall it and screw it down.

  • Remove the logic board EMI shield.

Solleva la schermatura EMI della scheda logica dal bordo più vicino alla parte superiore dell'iPad.

Togli la schermatura EMI dalla scheda logica.

Ci vuole un po' di forza a causa delle numerose piccole clip che tengono ferma la schermatura, e questa si potrebbe deformare leggermente. È ok, prova a deformarla il meno possibile, e si stenderà in modo piatto quando la reinstallerai e avviterai.

Rimuovi la schermatura EMI della scheda logica.

crwdns2944171:0crwdnd2944171:0crwdnd2944171:0crwdnd2944171:0crwdne2944171:0