crwdns2933423:0crwdne2933423:0

Reemplazo de PCB de Ariete Espresso Novecento 1387

crwdns2936315:0crwdne2936315:0
crwdns2936331:0crwdne2936331:0
crwdns2931653:03crwdne2931653:0
Ariete Espresso Novecento 1387 PCB Replacement: crwdns2935265:00crwdnd2935265:01crwdnd2935265:02crwdne2935265:0 Ariete Espresso Novecento 1387 PCB Replacement: crwdns2935265:00crwdnd2935265:02crwdnd2935265:02crwdne2935265:0
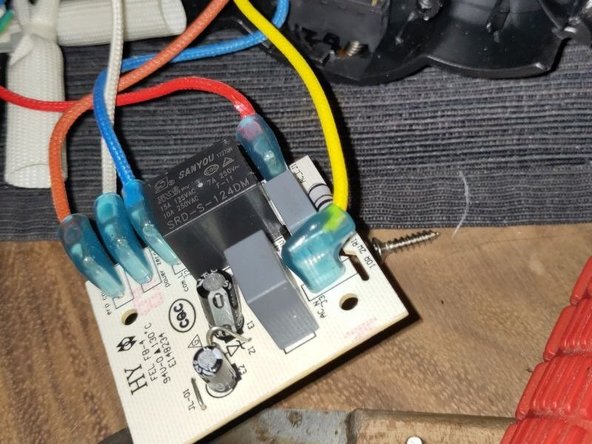
  • After removing the bottom plate, you can remove the PCB with just two screws. To remove the connectors, using a set of pliers can be useful.

  • In my case, this PCB was broken. At first I thought the Sanyou SRD-S-124DM relay was broken, but after some more investigation, I found that the board was not producing DC voltage any more.

  • For now I've given up fixing the PCB and could not find a replacement yet, but I found another "quick" fix, see next steps.

  • If you find a replacement PCB, just plug all the plugs back in the right place and replace the two screws. Don't forget to replace the sheet of plastic as well.

Después de quitar la placa inferior, puedes quitar la PCB con solo dos tornillos. Para quitar los conectores, puede resultar útil utilizar un juego de alicates.

En mi caso, este PCB estaba roto. Al principio pensé que el relé Sanyou SRD-S-124DM estaba roto, pero después de investigar un poco más, descubrí que la placa ya no producía voltaje CC.

Por ahora dejé de reparar la PCB y aún no pude encontrar un reemplazo, pero encontré otra solución "rápida", consulta los siguientes pasos.

Si encuentras una PCB de repuesto, simplemente vuelve a enchufar todos los enchufes en el lugar correcto y reemplaza los dos tornillos. No olvides reemplazar también la lámina de plástico.

crwdns2944171:0crwdnd2944171:0crwdnd2944171:0crwdnd2944171:0crwdne2944171:0