crwdns2933423:0crwdne2933423:0

Het ontladen van de condensator in de Polaroid I-2

crwdns2935425:03crwdne2935425:0

crwdns2936315:0crwdne2936315:0
crwdns2936313:0crwdne2936313:0
crwdns2931653:03crwdne2931653:0
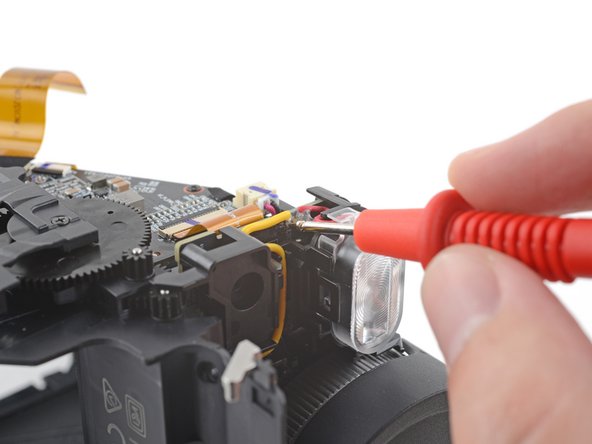
How to Discharge the Capacitor in your Polaroid I-2, Apply the leads: crwdns2935265:00crwdnd2935265:01crwdnd2935265:03crwdne2935265:0 How to Discharge the Capacitor in your Polaroid I-2, Apply the leads: crwdns2935265:00crwdnd2935265:02crwdnd2935265:03crwdne2935265:0 How to Discharge the Capacitor in your Polaroid I-2, Apply the leads: crwdns2935265:00crwdnd2935265:03crwdnd2935265:03crwdne2935265:0
Apply the leads
  • Touch the terminating end of the yellow wire with the red positive lead.

  • You may have to apply some extra force to puncture any remaining gel. If you aren't getting any feedback from your tool, check if this lead is puncturing the gel.

  • While applying the positive lead, touch the terminating end of the black wire with the black negative lead.

  • Depending on your discharge tool, you may need to hold the leads in this position for a few minutes.

  • Follow the instructions included with your tool to determine when your capacitor is fully discharged.

Plaats de rode pin van je tool op het blootliggende deel van de gele draad.

Als er nog wat gel zit, moet je mogelijk wat meer kracht zetten om er doorheen te komen. Als het lijkt alsof je pin geen contact maakt, zul je moeten controleren of je goed contact maakt met de soldeerverbinding.

Nu je rode pin contact maakt met de soldeerverbinding van de condensator plaats je de zwarte pin van je tool op het blootliggende deel van de zwarte draad.

Afhankelijk van je tool moet je de pinnen voor een paar minuten in deze positie vasthouden.

Volg de instructies die je bij je tool hebt gekregen op om te zien of de condensator volledig ontladen is.

crwdns2944171:0crwdnd2944171:0crwdnd2944171:0crwdnd2944171:0crwdne2944171:0