crwdns2933423:0crwdne2933423:0

Google Pixel 7a Akku tauschen

crwdns2936315:0crwdne2936315:0
crwdns2936319:0crwdne2936319:0
crwdns2931653:04crwdne2931653:0
Google Pixel 7a Battery Replacement, Slide the battery jacket: crwdns2935265:00crwdnd2935265:01crwdnd2935265:03crwdne2935265:0 Google Pixel 7a Battery Replacement, Slide the battery jacket: crwdns2935265:00crwdnd2935265:02crwdnd2935265:03crwdne2935265:0 Google Pixel 7a Battery Replacement, Slide the battery jacket: crwdns2935265:00crwdnd2935265:03crwdnd2935265:03crwdne2935265:0
Slide the battery jacket
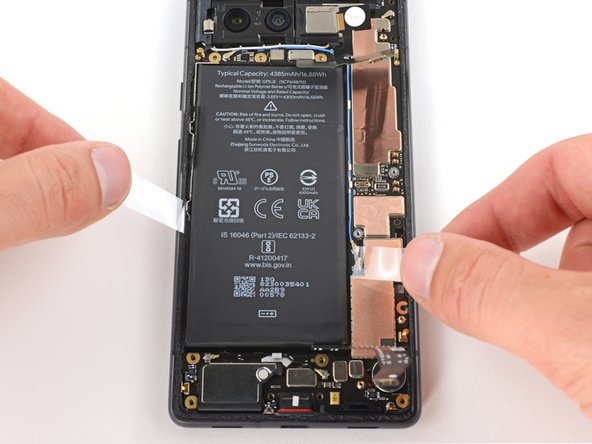
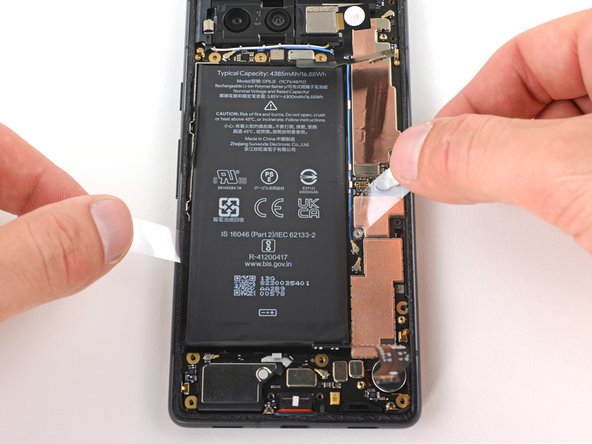
  • Firmly grip both sides of the battery jacket. Hold them at a low angle, but up high enough so they don't snag on any logic board components or the frame.

  • Slide each end of the jacket toward the top of the battery in a sawing motion to cut through the bottom portion of adhesive.

  • It might take a lot of back and forth sawing motions before the adhesive comes loose. If the jacket rips, skip down two steps for an alternate method.

  • Stop sawing when the jacket reaches halfway up the battery.

Fasse die Ummantelung des Akkus an beiden Seiten fest an. Halte sie flach, aber doch so hoch, dass sie sich nicht an Komponenten auf der Hauptplatine oder am Rahmen schaben können.

Schiebe die beiden Enden in einer sägenden Bewegung zur Oberkante des Akkus hin, um den unteren Teil des Klebers aufzuschneiden.

Wahrscheinlich benötigst du mehrere solche Sägeversuche, bevor der Kleber ganz aufgetrennt ist. Wenn die Ummantelung reißt, überspringe die nächsten beiden Schritte für eine alternative Methode.

Höre auf zu sägen, wenn die Ummantelung halb auf dem Weg nach oben angekommen ist.

crwdns2944171:0crwdnd2944171:0crwdnd2944171:0crwdnd2944171:0crwdne2944171:0