crwdns2933423:0crwdne2933423:0

Prérequis écran iPhone 14

crwdns2931529:0crwdnd2931529:0crwdnd2931529:0crwdnd2931529:03crwdnd2931529:0crwdne2931529:0

crwdns2936315:0crwdne2936315:0
crwdns2936317:0crwdne2936317:0
crwdns2931653:015crwdne2931653:0
iPhone 14 Screen prereq, Unfasten the display connector bracket screw: crwdns2935265:00crwdnd2935265:01crwdnd2935265:02crwdne2935265:0 iPhone 14 Screen prereq, Unfasten the display connector bracket screw: crwdns2935265:00crwdnd2935265:02crwdnd2935265:02crwdne2935265:0
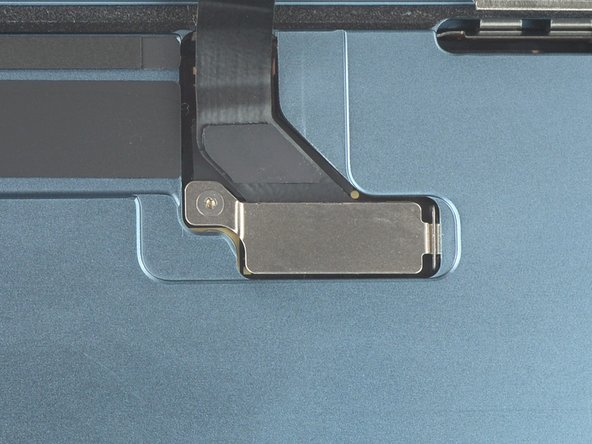
Unfasten the display connector bracket screw
  • Use a Y000 screwdriver to remove the 0.9 mm-long screw securing the display connector bracket.

  • Throughout this repair, keep track of each screw and make sure it goes back exactly where it came from to avoid damaging your iPhone.

  • During reassembly, this is a good point to power on your iPhone and test all functions before you seal the screen in place. Be sure to power your iPhone back down completely before you continue working.

Avec un tournevis Y000, dévissez la vis de 0,9 mm qui fixe le cache du connecteur d'écran.

Tout au long de cette réparation iPhone 14, gardez la trace de chacune des vis et veillez à les revisser toutes là où elles étaient auparavant, pour éviter d'endommager votre appareil.

Lors du remontage, voici venu le bon moment pour allumer votre iPhone et tester si tout fonctionne avant de sceller à nouveau l'écran. Pensez à rééteindre complètement votre iPhone avant de reprendre le remontage.

crwdns2944171:0crwdnd2944171:0crwdnd2944171:0crwdnd2944171:0crwdne2944171:0