crwdns2933423:0crwdne2933423:0

Microsoft Surface Laptop 4(13.5インチモデル)のヒートシンクとファンの交換

crwdns2931529:0crwdnd2931529:0crwdnd2931529:0crwdnd2931529:07crwdnd2931529:0crwdne2931529:0

crwdns2936315:0crwdne2936315:0
crwdns2936323:0crwdne2936323:0
crwdns2931653:06crwdne2931653:0
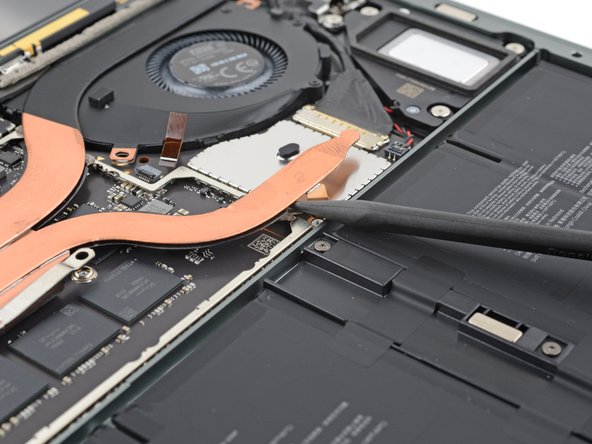
Microsoft Surface Laptop 4 (13.5-inch) Heatsink and Fan Replacement, Pry up the heatsink: crwdns2935265:00crwdnd2935265:01crwdnd2935265:03crwdne2935265:0 Microsoft Surface Laptop 4 (13.5-inch) Heatsink and Fan Replacement, Pry up the heatsink: crwdns2935265:00crwdnd2935265:02crwdnd2935265:03crwdne2935265:0 Microsoft Surface Laptop 4 (13.5-inch) Heatsink and Fan Replacement, Pry up the heatsink: crwdns2935265:00crwdnd2935265:03crwdnd2935265:03crwdne2935265:0
Pry up the heatsink
  • Thermal paste bonds the heatsink to the CPU.

  • Insert your spudger under the left heat pipe.

  • Pry up to release the left section of the heatsink.

  • This may take some force. Be careful not to bend the heat pipes.

  • Repeat this procedure for the right heat pipe and the CPU screw mounts until the heatsink is completely separated from the motherboard.

ヒートシンクとCPUは放熱グリスで貼り付いています。

スパッジャーを左側のヒートパイプの下に差し込みます。

こじり上げて左側のヒートシンクを外します。

この作業では若干力を入れる必要があるかも知れません。ヒートパイプを曲げないように注意して下さい。

同じ手順を右側のヒートパイプとCPUのネジ取り付け金具についても行って、ヒートシンクとマザーボードの固定を完全に外して下さい。

crwdns2944171:0crwdnd2944171:0crwdnd2944171:0crwdnd2944171:0crwdne2944171:0