crwdns2933423:0crwdne2933423:0

Tarjeta madre del estuche de los Google Pixel Buds A-Series

crwdns2936315:0crwdne2936315:0
crwdns2936331:0crwdne2936331:0
crwdns2931653:04crwdne2931653:0
Google Pixel Buds A-Series Mainboard Replacement, Opening the top half: crwdns2935265:00crwdnd2935265:01crwdnd2935265:02crwdne2935265:0 Google Pixel Buds A-Series Mainboard Replacement, Opening the top half: crwdns2935265:00crwdnd2935265:02crwdnd2935265:02crwdne2935265:0
Opening the top half
  • If you're interested in taking apart the top half, I've added some more steps. Otherwise, just replace your main board and put it back together.

  • On my second case, it had an issue preventing it from detecting if the top was opened or closed, presumably causing the battery to drain because it never went to sleep.

  • To get at the top section, remove the two screws on either side of the battery.

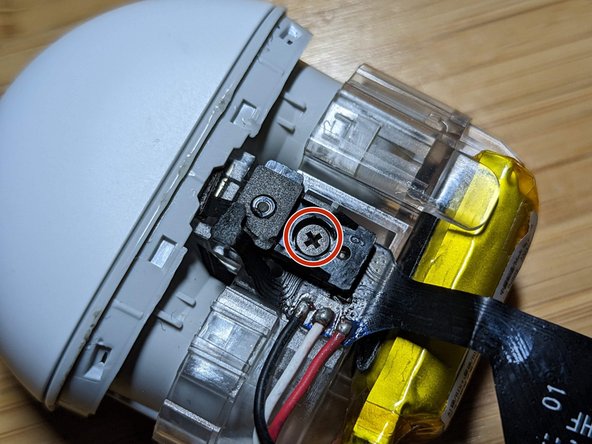
  • Next remove the screw holding cover for the LED and remove the cover. This step is probably optional.

Agregué algunos pasos más por si estás interesado en abrir la mitad de arriba. De otra forma sólo remplaza la tarjeta y vuelve a armar el dispositivo.

El problema que tenía el otro estuche es que no detectaba si estaba abierto o cerrado, lo que causaba que la batería se vaciara porque nunca entraban en modo reposo.

Para acceder a la sección de arriba quita los dos tornillos de cada lado de la batería.

Después quita el tornillo que sostiene la carátula del LED y despréndela. Puede que este paso sea opcional.

crwdns2944171:0crwdnd2944171:0crwdnd2944171:0crwdnd2944171:0crwdne2944171:0