crwdns2933423:0crwdne2933423:0

iPad Air 4のバッテリー交換

crwdns2936315:0crwdne2936315:0
crwdns2936323:0crwdne2936323:0
crwdns2931653:012crwdne2931653:0
iPad Air 4 Battery Replacement, Lift the logic board: crwdns2935265:00crwdnd2935265:01crwdnd2935265:03crwdne2935265:0 iPad Air 4 Battery Replacement, Lift the logic board: crwdns2935265:00crwdnd2935265:02crwdnd2935265:03crwdne2935265:0 iPad Air 4 Battery Replacement, Lift the logic board: crwdns2935265:00crwdnd2935265:03crwdnd2935265:03crwdne2935265:0
Lift the logic board
  • Lay the iPad screen side up.

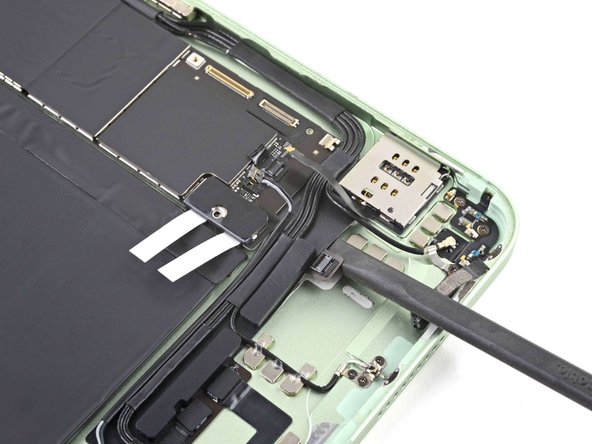
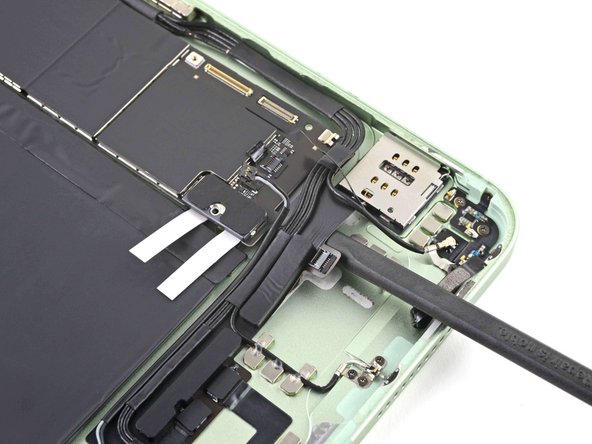
  • Slide the flat end of a spudger under the cellular wireless connector until the logic board lifts and the battery blocker card strips are loose.

  • Don't force the spudger in or pry up. If it's difficult to insert or slide the spudger, apply more heat. Alternatively, a few drops of high-strength (>90%) isopropyl alcohol may be used to soften the adhesive.

  • Leave the spudger in to prevent the adhesive from re-sealing.

iPadの画面側を上にして置く

スパッジャーの平面側をセルラーワイヤレスコネクターの下に挿入し、ロジックボードが持ち上がりバッテリーブロッカーが緩くなって外れるまでまっすぐ滑り込ませる

スパッジャーを無理に押し込んだりこじったりしてはいけません。スパッジャーを挿入したり滑り込ませるのが難しい場合は、追加で加熱して下さい。もしくは、高濃度(90%以上)のイソプロピルアルコールを少量使って接着を緩くすることもできます

スパッジャーは挿入したままにしておき、剥がした部分が再接着するのを防ぎます

crwdns2944171:0crwdnd2944171:0crwdnd2944171:0crwdnd2944171:0crwdne2944171:0