crwdns2933423:0crwdne2933423:0

Desmontaje del teclado Apple para limpiar la membrana de PCB

crwdns2936315:0crwdne2936315:0
crwdns2936331:0crwdne2936331:0
crwdns2931653:05crwdne2931653:0
Apple Keyboard disassembly to clean PCB Membrane: crwdns2935265:00crwdnd2935265:01crwdnd2935265:03crwdne2935265:0 Apple Keyboard disassembly to clean PCB Membrane: crwdns2935265:00crwdnd2935265:02crwdnd2935265:03crwdne2935265:0 Apple Keyboard disassembly to clean PCB Membrane: crwdns2935265:00crwdnd2935265:03crwdnd2935265:03crwdne2935265:0
  • There are 3 plastic membranes, the key presses are created by the top layer points pressing against the bottom points.

  • in between the top and bottom layers is a clear piece of plastic membrane.

  • The key to repairing any broken keys is to find them, then follow the green line for each broken key back to the next key that works.

  • Once you find a key that works on the same green line as your broken one, you can...

  • Draw a line with your conductive pen to connect the broken and working key.

  • Remember, only on the same green line. If you cross lines your keys will not work correctly.

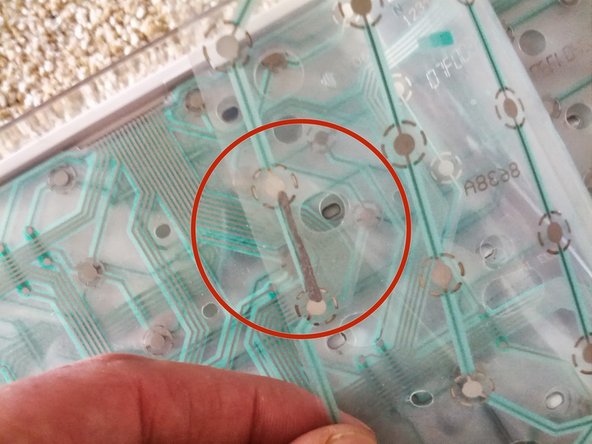
  • You can see the dark lines on my pictures connecting the broken keys. In some cases, i've gently scratched away the green covering to expose the wire underneath, and connected my keys to that instead of drawing a long messy line.

  • Often the key doesn't work without drawing lines on the top and bottom PCB membrane. Both sides will use slightly different routes, so remember to follow your green lines carefully.

Hay 3 membranas de plástico, las pulsaciones de teclas se crean mediante los puntos de la capa superior presionando contra los puntos inferiores.

entre las capas superior e inferior hay una pieza de plástico transparente.

La clave para reparar las llaves rotas es encontrarlas, luego seguir la línea verde de cada llave rota hasta la siguiente llave que funcione.

Una vez que encuentre una clave que funcione en la misma línea verde que su línea rota, puede ...

Traza una línea con tu pluma conductiva para conectar la llave rota y que funciona. Recuerde, solo en la misma línea verde. Si cruzas líneas, tus llaves no funcionarán correctamente.

Puedes ver las líneas oscuras en mis imágenes conectando las llaves rotas. En algunos casos, he rasguñado suavemente la cubierta verde para exponer el cable debajo, y conecté mis llaves a eso en vez de dibujar una larga línea desordenada.

A menudo, la clave no funciona sin dibujar líneas en la membrana superior e inferior de PCB.

Ambas partes usarán rutas ligeramente diferentes, así que recuerde seguir sus líneas verdes con cuidado.

crwdns2944171:0crwdnd2944171:0crwdnd2944171:0crwdnd2944171:0crwdne2944171:0