crwdns2933423:0crwdne2933423:0

Google Pixel 6の接着剤の交換方法

crwdns2931527:0crwdnd2931527:0crwdnd2931527:0crwdnd2931527:0crwdne2931527:0

crwdns2936315:0crwdne2936315:0
crwdns2936323:0crwdne2936323:0
crwdns2931653:05crwdne2931653:0
How to Replace the Adhesive for Your Google Pixel 6, Apply the adhesive: crwdns2935265:00crwdnd2935265:01crwdnd2935265:03crwdne2935265:0 How to Replace the Adhesive for Your Google Pixel 6, Apply the adhesive: crwdns2935265:00crwdnd2935265:02crwdnd2935265:03crwdne2935265:0 How to Replace the Adhesive for Your Google Pixel 6, Apply the adhesive: crwdns2935265:00crwdnd2935265:03crwdnd2935265:03crwdne2935265:0
Apply the adhesive
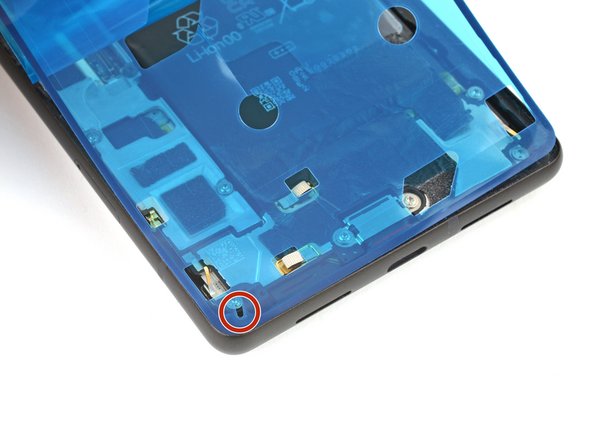
  • Be very careful during this step! The adhesive is very sticky and can't be repositioned once it sticks. Misaligned adhesive can lead to an improper seal.

  • Lay the adhesive onto the frame, starting with the bottom or top edge. Make small corrections as you go.

  • There are holes in the bottom left and top right corners to help align the adhesive.

この作業には十分な注意が必要です。接着剤は非常に接着力が強く、一度貼り付けると元に戻せません。接着剤の位置がずれていると、シールがうまくいかないことがあります。

フレームの下端から順に接着剤を貼っていきます。少しずつ修正しながら進めてください。

左下と右上の角には、粘着剤の位置を合わせるための穴が開いています。

crwdns2944171:0crwdnd2944171:0crwdnd2944171:0crwdnd2944171:0crwdne2944171:0