crwdns2933423:0crwdne2933423:0

iPad 9 (2021) Display und Touch-Glas (WiFi & Cellular) tauschen

crwdns2936315:0crwdne2936315:0
crwdns2936319:0crwdne2936319:0
crwdns2931653:014crwdne2931653:0
iPad 9 (2021) Screen and Touch Glass (WiFi & Cellular) Replacement, Home button installation - part #1: crwdns2935265:00crwdnd2935265:01crwdnd2935265:03crwdne2935265:0 iPad 9 (2021) Screen and Touch Glass (WiFi & Cellular) Replacement, Home button installation - part #1: crwdns2935265:00crwdnd2935265:02crwdnd2935265:03crwdne2935265:0 iPad 9 (2021) Screen and Touch Glass (WiFi & Cellular) Replacement, Home button installation - part #1: crwdns2935265:00crwdnd2935265:03crwdnd2935265:03crwdne2935265:0
Home button installation - part #1
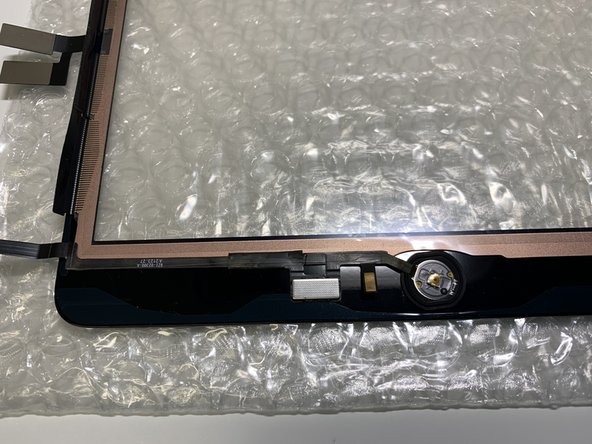
  • place the button in the intended place. Make sure once again that you have removed all possible dirt and particles from the glass of the previous digitizer

  • lead the cable along the edge of the digitizer layer in the left direction - parallel to the bottom edge of the screen. Whether the tape will overlap the digizer level (a layer with copper mini-wires) depends on the construction of the replacement shield itself. In the original ones there is room to leave a 0.5mm gap.

  • In my case, the button tape overlaps 0.5mm on the digitizer. Everything is OK.

  • put the home button bracket in the right place and stick it. In the original, the braket is additionally secured with a thin layer of hot glue

Setze den Home Button an der vorgesehenen Stelle ein. Vergewissere dich noch einmal, dass du alle Verschmutzungen und Glaspartikel des vorherigen Touchscreens entfernt hast.

Führe das Kabel entlang der Kante der Touchscreen-Schicht nach links - parallel zur Unterkante des Displays. Ob das Kabel die Touchscreen-Schicht (eine Schicht mit Kupfer-Minidrähten) überlappt, hängt vom Aufbau der Ersatzabschirmung selbst ab. Bei den Originalen ist Platz für einen Spalt von 0,5 mm.

Bei mir überlappt das Tastenkabel den Touchscreen um 0,5 mm. Alles in Ordnung.

Setze die Halterung für den Home Button an der richtigen Stelle ein und klebe sie fest. Im Original ist die Halterung zusätzlich mit einer dünnen Schicht Heißkleber gesichert.

crwdns2944171:0crwdnd2944171:0crwdnd2944171:0crwdnd2944171:0crwdne2944171:0