crwdns2933423:0crwdne2933423:0

Deksel verwijderen

crwdns2931527:0crwdnd2931527:0crwdnd2931527:0crwdnd2931527:0crwdne2931527:0

crwdns2935425:03crwdne2935425:0

crwdns2936315:0crwdne2936315:0
crwdns2936313:0crwdne2936313:0
crwdns2931653:03crwdne2931653:0
Removing the lid, Disconnect LED cable: crwdns2935265:00crwdnd2935265:01crwdnd2935265:03crwdne2935265:0 Removing the lid, Disconnect LED cable: crwdns2935265:00crwdnd2935265:02crwdnd2935265:03crwdne2935265:0 Removing the lid, Disconnect LED cable: crwdns2935265:00crwdnd2935265:03crwdnd2935265:03crwdne2935265:0
Disconnect LED cable
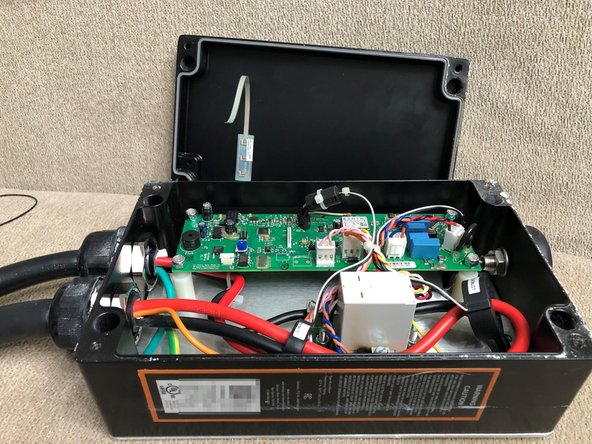
  • If your box has LEDs, slowly tilt the edge of the case away, revealing the ribbon cable connected to the board.

  • Lift the lock in the direction of the ribbon cable, and you should feel the ribbon cable release.

  • You may now remove the ribbon cable from the board, and place the lid aside.

  • During reassembly, note that the ribbon cable contacts should face opposite the lock slider (as in photo). To re-insert the ribbon cable, first release the lock, insert the cable, then press the lock back down to latch it in place.

Als je box LED's heeft, kantel je de rand van de behuizing langzaam weg, zodat de lintkabel zichtbaar wordt die op de print is aangesloten.

Til de vergrendeling op in de richting van de lintkabel. Je voelt nu dat de lintkabel loskomt.

Je kunt nu de lintkabel van het bord verwijderen en het deksel opzij leggen.

Houd er tijdens het opnieuw monteren rekening mee dat de contacten van de lintkabel tegenover de vergrendelschuif moeten wijzen (zoals op de foto). Om de lintkabel opnieuw in te voeren, maak je eerst het slot los, steek je de kabel erin en druk je vervolgens het slot weer naar beneden om het op zijn plaats te vergrendelen.

crwdns2944171:0crwdnd2944171:0crwdnd2944171:0crwdnd2944171:0crwdne2944171:0