crwdns2933423:0crwdne2933423:0

iPad Pro 11インチ 第二世代 ロジックボードの交換

crwdns2931527:0crwdnd2931527:0crwdnd2931527:0crwdnd2931527:0crwdne2931527:0

crwdns2935425:029crwdne2935425:0

crwdns2936315:0crwdne2936315:0
crwdns2936323:0crwdne2936323:0
crwdns2931653:029crwdne2931653:0
iPad Pro 11" 2nd Gen Logic Board Replacement, Remove the logic board: crwdns2935265:00crwdnd2935265:01crwdnd2935265:03crwdne2935265:0 iPad Pro 11" 2nd Gen Logic Board Replacement, Remove the logic board: crwdns2935265:00crwdnd2935265:02crwdnd2935265:03crwdne2935265:0 iPad Pro 11" 2nd Gen Logic Board Replacement, Remove the logic board: crwdns2935265:00crwdnd2935265:03crwdnd2935265:03crwdne2935265:0
Remove the logic board
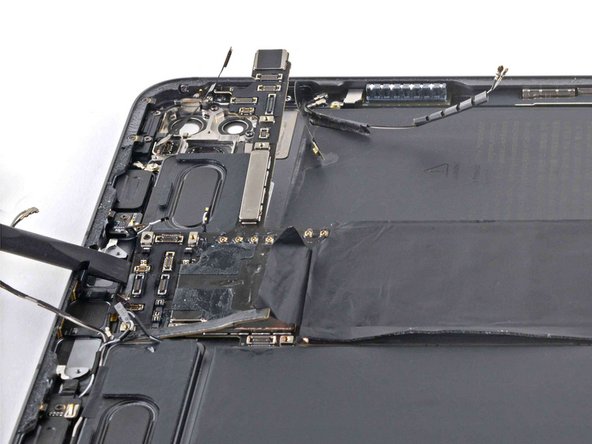
  • Use the flat end of a spudger to lift the top edge of the logic board.

  • Grip the top and bottom edges of the logic board.

  • Remove the logic board.

  • Remove the old adhesive from the rear case and bottom of the logic board using tweezers and high concentration isopropyl alcohol with a lint-free cloth where needed.

  • During reassembly, apply strips of Tesa tape to the bottom of the logic board.

スパッジャーの平らな方を使って、ロジックボードの上端を持ち上げます。

ロジックボードの上端と下端を掴んで下さい。

ロジックボードを取り外して下さい。

筐体やロジックボードの下に残った古い接着剤は、ピンセットや高濃度のイソプロピルアルコール、必要に応じて埃のつかない布を使って取り除いて下さい。

組み立て直す際はロジックボードの下側にTesa tapeを貼って下さい。

crwdns2944171:0crwdnd2944171:0crwdnd2944171:0crwdnd2944171:0crwdne2944171:0