crwdns2933423:0crwdne2933423:0

Sostituzione scheda logica iPad Pro 11" 2a generazione

crwdns2931527:0crwdnd2931527:0crwdnd2931527:0crwdnd2931527:0crwdne2931527:0

crwdns2935425:029crwdne2935425:0

crwdns2936315:0crwdne2936315:0
crwdns2936321:0crwdne2936321:0
crwdns2931653:029crwdne2931653:0
iPad Pro 11" 2nd Gen Logic Board Replacement, Remove the logic board: crwdns2935265:00crwdnd2935265:01crwdnd2935265:03crwdne2935265:0 iPad Pro 11" 2nd Gen Logic Board Replacement, Remove the logic board: crwdns2935265:00crwdnd2935265:02crwdnd2935265:03crwdne2935265:0 iPad Pro 11" 2nd Gen Logic Board Replacement, Remove the logic board: crwdns2935265:00crwdnd2935265:03crwdnd2935265:03crwdne2935265:0
Remove the logic board
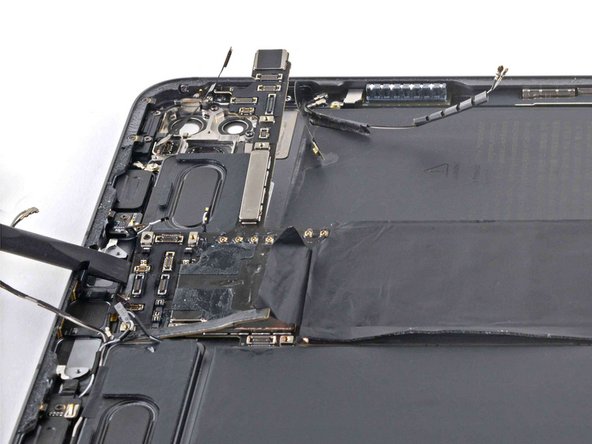
  • Use the flat end of a spudger to lift the top edge of the logic board.

  • Grip the top and bottom edges of the logic board.

  • Remove the logic board.

  • Remove the old adhesive from the rear case and bottom of the logic board using tweezers and high concentration isopropyl alcohol with a lint-free cloth where needed.

  • During reassembly, apply strips of Tesa tape to the bottom of the logic board.

Usa l'estremità piatta di uno spudger per sollevare il bordo superiore della scheda logica.

Afferra i bordi superiore e inferiore della scheda logica.

Rimuovi la scheda logica.

Rimuovi il vecchio adesivo dal case posteriore e dal fondo della scheda logica usando delle pinzette e alcool isopropilico ad alta concentrazione con un panno privo di lanugine dove necessario.

Durante il rimontaggio, applica strisce di nastro adesivo Tesa alla base della scheda logica.

crwdns2944171:0crwdnd2944171:0crwdnd2944171:0crwdnd2944171:0crwdne2944171:0