crwdns2933423:0crwdne2933423:0

iPad Pro (11 Zoll, 2. Generation) Logic Board tauschen

crwdns2931527:0crwdnd2931527:0crwdnd2931527:0crwdnd2931527:0crwdne2931527:0

crwdns2935425:029crwdne2935425:0

crwdns2936315:0crwdne2936315:0
crwdns2936319:0crwdne2936319:0
crwdns2931653:029crwdne2931653:0
iPad Pro 11" 2nd Gen Logic Board Replacement, Remove the logic board: crwdns2935265:00crwdnd2935265:01crwdnd2935265:03crwdne2935265:0 iPad Pro 11" 2nd Gen Logic Board Replacement, Remove the logic board: crwdns2935265:00crwdnd2935265:02crwdnd2935265:03crwdne2935265:0 iPad Pro 11" 2nd Gen Logic Board Replacement, Remove the logic board: crwdns2935265:00crwdnd2935265:03crwdnd2935265:03crwdne2935265:0
Remove the logic board
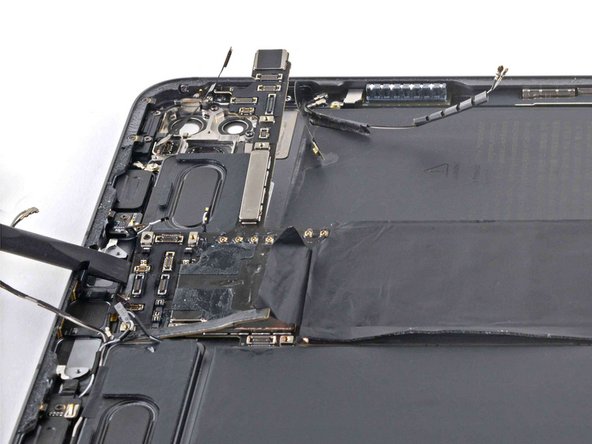
  • Use the flat end of a spudger to lift the top edge of the logic board.

  • Grip the top and bottom edges of the logic board.

  • Remove the logic board.

  • Remove the old adhesive from the rear case and bottom of the logic board using tweezers and high concentration isopropyl alcohol with a lint-free cloth where needed.

  • During reassembly, apply strips of Tesa tape to the bottom of the logic board.

Hebe das Logic Board mit dem flachen Ende des Spudgers an der Oberkante hoch.

Fasse die obere und die untere Kante des Logic Boards.

Entferne das Logic Board.

Entferne die Kleberreste an den nötigen Stellen vom Rückgehäuse und der Unterseite des Logic Boards. Benutze dazu eine Pinzette, hochkonzentrierten Isopropylakohol und ein fusselfreies Tuch.

Bringe beim Zusammenbau Tesaband auf der Unterseite des Logic Boards an.

crwdns2944171:0crwdnd2944171:0crwdnd2944171:0crwdnd2944171:0crwdne2944171:0