crwdns2933423:0crwdne2933423:0

LED Glyph-Baugruppe

crwdns2931529:0crwdnd2931529:0crwdnd2931529:0crwdnd2931529:06crwdnd2931529:0crwdne2931529:0

crwdns2936315:0crwdne2936315:0
crwdns2936319:0crwdne2936319:0
crwdns2931653:027crwdne2931653:0
LED Glyph Assembly, Pry up the motherboard cover: crwdns2935265:00crwdnd2935265:01crwdnd2935265:03crwdne2935265:0 LED Glyph Assembly, Pry up the motherboard cover: crwdns2935265:00crwdnd2935265:02crwdnd2935265:03crwdne2935265:0 LED Glyph Assembly, Pry up the motherboard cover: crwdns2935265:00crwdnd2935265:03crwdnd2935265:03crwdne2935265:0
Pry up the motherboard cover
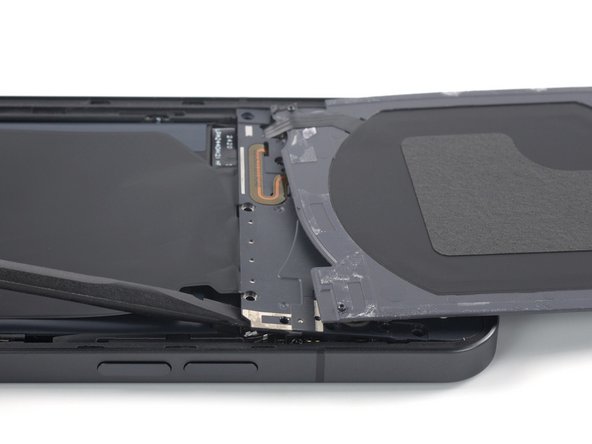
  • Carefully fold the charging coil to the top edge of the phone to access the bottom edge of the motherboard cover.

  • Insert the flat end of a spudger underneath the bottom right edge of the motherboard cover.

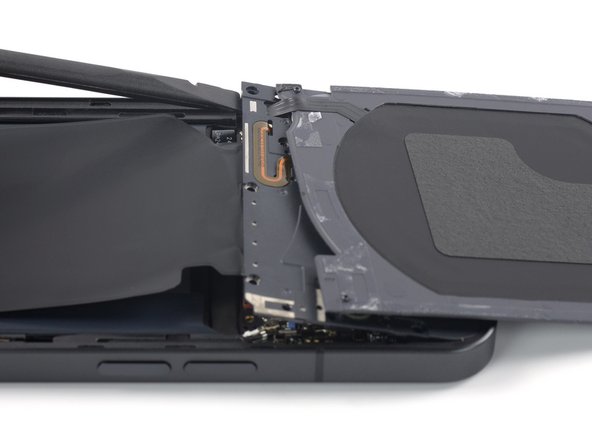
  • Pry up with the spudger to release the motherboard cover from its clips.

  • Repeat the prying procedure for the bottom left edge of the motherboard cover.

Klappe die Ladespule vorsichtig zur Oberkante des Smartphones hin, um an die Unterkante der Abdeckung der Hauptplatine heranzukommen.

Setze einen Spudger mit dem flachen Ende unter die rechte untere Kante der Abdeckung der Hauptplatine ein.

Heble mit dem Spudger nach oben, bis sich die Rasten der Abdeckung der Hauptplatine lösen.

Wiederhole diesen Vorgang für die Rasten an der linken unteren Kante der Abdeckung der Hauptplatine.

crwdns2944171:0crwdnd2944171:0crwdnd2944171:0crwdnd2944171:0crwdne2944171:0