crwdns2933423:0crwdne2933423:0

LED Glyph Assembly

crwdns2931529:0crwdnd2931529:0crwdnd2931529:0crwdnd2931529:06crwdnd2931529:0crwdne2931529:0

crwdns2936315:0crwdne2936315:0
crwdns2936323:0crwdne2936323:0
crwdns2931653:05crwdne2931653:0
LED Glyph Assembly, Remove the bottom LED glyph assembly: crwdns2935265:00crwdnd2935265:01crwdnd2935265:03crwdne2935265:0 LED Glyph Assembly, Remove the bottom LED glyph assembly: crwdns2935265:00crwdnd2935265:02crwdnd2935265:03crwdne2935265:0 LED Glyph Assembly, Remove the bottom LED glyph assembly: crwdns2935265:00crwdnd2935265:03crwdnd2935265:03crwdne2935265:0
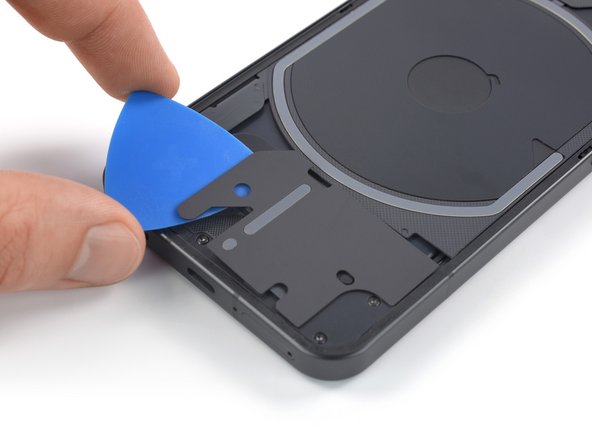
Remove the bottom LED glyph assembly
  • Be very careful when working on the bottom LED assembly. There's a cable running underneath its whole surface that can be damaged easily.

  • The bottom LED assembly is held in place by small pieces of adhesive.

  • Slide an opening pick underneath the right, bottom and left edge of the bottom LED assembly to carefully separate it from the daughterboard cover.

  • Do not slide the opening pick deeper than shown in the photos. Otherwise you risk damaging the LED cable.

crwdns2935429:0crwdne2935429:0

crwdns2935429:0crwdne2935429:0

crwdns2935429:0crwdne2935429:0

crwdns2935429:0crwdne2935429:0

crwdns2944171:0crwdnd2944171:0crwdnd2944171:0crwdnd2944171:0crwdne2944171:0