crwdns2933423:0crwdne2933423:0

Assemblaggio LED glyph

crwdns2931529:0crwdnd2931529:0crwdnd2931529:0crwdnd2931529:06crwdnd2931529:0crwdne2931529:0

crwdns2936315:0crwdne2936315:0
crwdns2936321:0crwdne2936321:0
crwdns2931653:05crwdne2931653:0
LED Glyph Assembly, Remove the bottom LED glyph assembly: crwdns2935265:00crwdnd2935265:01crwdnd2935265:03crwdne2935265:0 LED Glyph Assembly, Remove the bottom LED glyph assembly: crwdns2935265:00crwdnd2935265:02crwdnd2935265:03crwdne2935265:0 LED Glyph Assembly, Remove the bottom LED glyph assembly: crwdns2935265:00crwdnd2935265:03crwdnd2935265:03crwdne2935265:0
Remove the bottom LED glyph assembly
  • Be very careful when working on the bottom LED assembly. There's a cable running underneath its whole surface that can be damaged easily.

  • The bottom LED assembly is held in place by small pieces of adhesive.

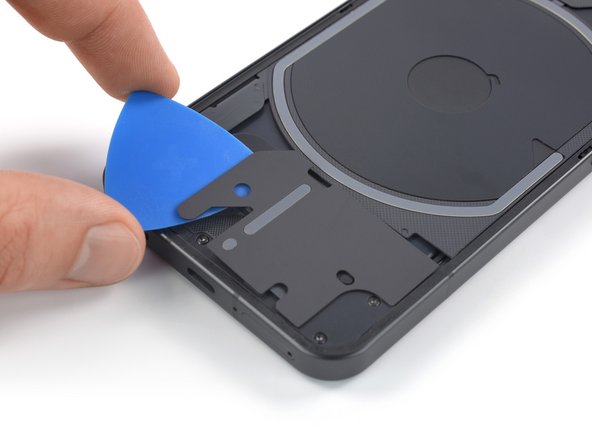
  • Slide an opening pick underneath the right, bottom and left edge of the bottom LED assembly to carefully separate it from the daughterboard cover.

  • Do not slide the opening pick deeper than shown in the photos. Otherwise you risk damaging the LED cable.

Stai molto attento quando lavori al gruppo LED inferiore. C'è un cavo che passa sotto la sua intera superficie che può essere facilmente danneggiato.

Il gruppo LED inferiore è fissato in posizione da piccoli pezzi di adesivo.

Fai scivolare un plettro di apertura sotto il bordo destro, inferiore e sinistro del gruppo LED inferiore per separarlo delicatamente dalla copertura della scheda figlia.

Non far scivolare il plettro di apertura più in fondo rispetto a come è mostrato nelle foto, altrimenti rischi di danneggiare il cavo LED.

crwdns2944171:0crwdnd2944171:0crwdnd2944171:0crwdnd2944171:0crwdne2944171:0