crwdns2933423:0crwdne2933423:0

Sostituzione dello schermo e della batteria del Wahoo Elemnt Roam (WFCC4)

crwdns2936315:0crwdne2936315:0
crwdns2936321:0crwdne2936321:0
crwdns2931653:08crwdne2931653:0
Wahoo Elemnt Roam (WFCC4) Screen and Battery Replacement, Reinstall Mainboard: crwdns2935265:00crwdnd2935265:01crwdnd2935265:02crwdne2935265:0 Wahoo Elemnt Roam (WFCC4) Screen and Battery Replacement, Reinstall Mainboard: crwdns2935265:00crwdnd2935265:02crwdnd2935265:02crwdne2935265:0
Reinstall Mainboard
  • Guide the two ribbon cables for the LEDs and screen through the cable guides on the left side of the mainboard

  • Ensure that the mainboard is positioned correctly and look out for the two guide pins in the top and lower right hand corners of the top case (see arrows)

  • Use a Torx 5 screw driver to screw in the four screws, fastening the mainboard to the top of the case (red circles)

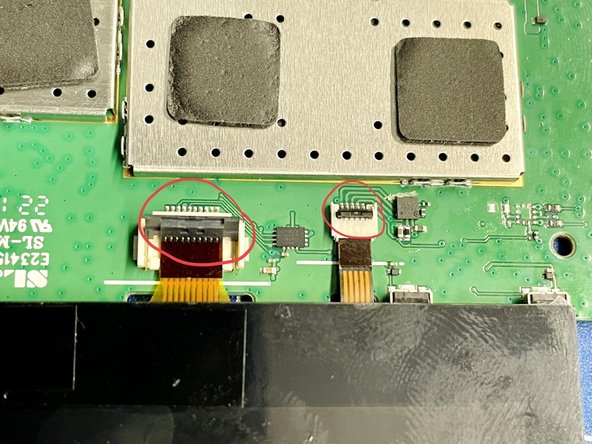
  • Connect the two ribbon cables to the mainboard. Ensure that the black plastic tabs (red circles in the second picture), are in the up position before you insert the ribbon cables

  • Push down the two black plastic tabs (red circles in the second picture), to secure the ribbon cables

Fai passare i due cavi a nastro per i LED e lo schermo attraverso le guide dei cavi nella parte sinistra della scheda madre

Assicurati che la scheda madre sia posizionata correttamente e controlla i due perni di guida negli angoli superiore e inferiore destri della parte superiore del case (guarda le frecce)

Usa un cacciavite Torx 5 per avvitare le quattro viti, agganciando la scheda madre alla parte superiore del case (cerchi rossi)

Connetti i due cavi a nastro alla scheda madre. Assicurati che le alette nere di plastica (cerchi rossi nella seconda foto) siano messe su in posizione prima di inserire i cavi a nastro

Spingi giù le due alette nere di plastica (cerchi rossi nella seconda foto) per fissare i cavi a nastro

crwdns2944171:0crwdnd2944171:0crwdnd2944171:0crwdnd2944171:0crwdne2944171:0