crwdns2933423:0crwdne2933423:0

Reemplazo de pantalla y batería de Wahoo Elemnt Roam (WFCC4)

crwdns2936315:0crwdne2936315:0
crwdns2936331:0crwdne2936331:0
crwdns2931653:08crwdne2931653:0
Wahoo Elemnt Roam (WFCC4) Screen and Battery Replacement, Reinstall Mainboard: crwdns2935265:00crwdnd2935265:01crwdnd2935265:02crwdne2935265:0 Wahoo Elemnt Roam (WFCC4) Screen and Battery Replacement, Reinstall Mainboard: crwdns2935265:00crwdnd2935265:02crwdnd2935265:02crwdne2935265:0
Reinstall Mainboard
  • Guide the two ribbon cables for the LEDs and screen through the cable guides on the left side of the mainboard

  • Ensure that the mainboard is positioned correctly and look out for the two guide pins in the top and lower right hand corners of the top case (see arrows)

  • Use a Torx 5 screw driver to screw in the four screws, fastening the mainboard to the top of the case (red circles)

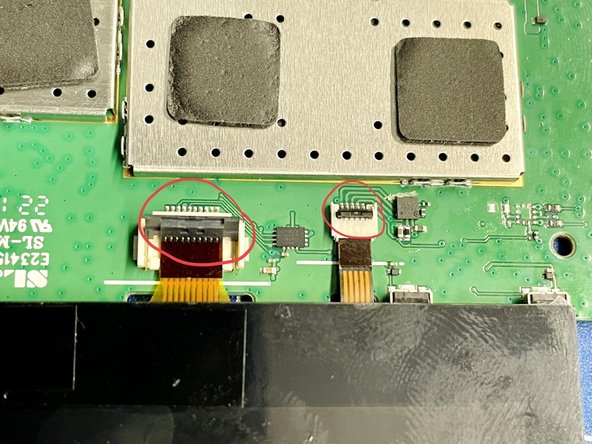
  • Connect the two ribbon cables to the mainboard. Ensure that the black plastic tabs (red circles in the second picture), are in the up position before you insert the ribbon cables

  • Push down the two black plastic tabs (red circles in the second picture), to secure the ribbon cables

Guía los dos cables planos para los LED y la pantalla a través de las guías de cables en el lado izquierdo de la placa base.

Asegúrate de que la placa madre esté colocada correctamente y busca los dos pasadores guía en las esquinas superior e inferior derecha de la carcasa superior (ver flechas).

Utiliza un destornillador Torx 5 para atornillar los cuatro tornillos, fijando la placa madre a la parte superior de la caja (círculos rojos)

Conecta los dos cables planos a la placa base. Asegúrate de que las pestañas de plástico negro (círculos rojos en la segunda imagen) estén en la posición superior antes de insertar los cables planos.

Empuja hacia abajo las dos pestañas de plástico negro (círculos rojos en la segunda imagen) para asegurar los cables planos.

crwdns2944171:0crwdnd2944171:0crwdnd2944171:0crwdnd2944171:0crwdne2944171:0