crwdns2933423:0crwdne2933423:0

Samsung Galaxy A72 스크린 교체

crwdns2936315:0crwdne2936315:0
crwdns2936325:0crwdne2936325:0
crwdns2931653:03crwdne2931653:0
Samsung Galaxy A72 Screen Replacement, Create a gap: crwdns2935265:00crwdnd2935265:01crwdnd2935265:03crwdne2935265:0 Samsung Galaxy A72 Screen Replacement, Create a gap: crwdns2935265:00crwdnd2935265:02crwdnd2935265:03crwdne2935265:0 Samsung Galaxy A72 Screen Replacement, Create a gap: crwdns2935265:00crwdnd2935265:03crwdnd2935265:03crwdne2935265:0
Create a gap
  • Once the screen is warm to touch, apply a suction cup to the left edge of the screen.

  • If your screen is badly cracked, covering it with a layer of clear packing tape may allow the suction cup to adhere. Alternatively, very strong tape may be used instead of the suction cup. If all else fails, you can superglue the suction cup to the screen.

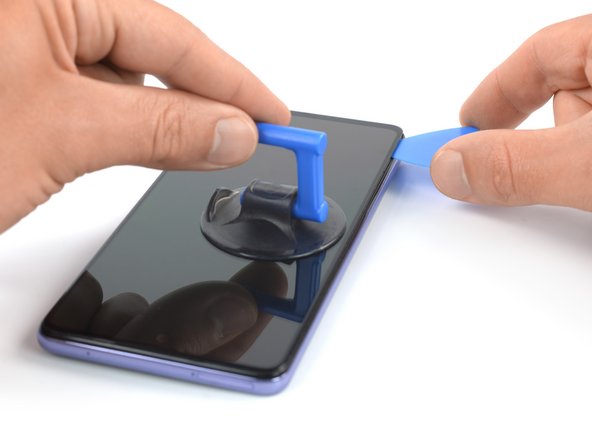
  • Lift the screen with the suction handle to create a small gap between the screen and the front panel assembly.

  • Insert an opening pick in the gap between the front panel assembly and the screen.

  • Slide the opening pick to the bottom left corner of the screen to slice its adhesive.

  • Leave the opening pick in place to prevent the adhesive from resealing.

스크린이 따뜻해지면 스크린 왼편 가장자리에 흡입 컵을 부착하세요.

스크린이 심하게 깨졌으면, 투명한 포장 테이프를 스크린에 붙여서 흡입 컵을 부착할 수 있습니다. 대안으로, 흡입 핸들 대신 매우 강한 테이프를 사용할 수 있습니다. 다른 모든 방법이 실패하면 초강력 접착제로 흡입 컵을 스크린에 붙일 수 있습니다.

흡입 손잡이로 스크린을 들어 올려서 스크린과 전면 패널 어셈블리 사이에 작은 틈을 만드세요.

전면 패널 어셈블리와 스크린 사이의 틈에 여는 픽을 끼우세요.

여는 픽을 스크린 하단 왼편 모서리로 밀어서 접착제를 자르세요.

접착제가 다시 붙지 않도록 그 자리에 여는 픽을 남겨 두세요.

crwdns2944171:0crwdnd2944171:0crwdnd2944171:0crwdnd2944171:0crwdne2944171:0