crwdns2933423:0crwdne2933423:0

Google Pixel 5a Akku tauschen

crwdns2936315:0crwdne2936315:0
crwdns2936319:0crwdne2936319:0
crwdns2931653:02crwdne2931653:0
Google Pixel 5a Battery Replacement, Slice the adhesive: crwdns2935265:00crwdnd2935265:01crwdnd2935265:03crwdne2935265:0 Google Pixel 5a Battery Replacement, Slice the adhesive: crwdns2935265:00crwdnd2935265:02crwdnd2935265:03crwdne2935265:0 Google Pixel 5a Battery Replacement, Slice the adhesive: crwdns2935265:00crwdnd2935265:03crwdnd2935265:03crwdne2935265:0
Slice the adhesive
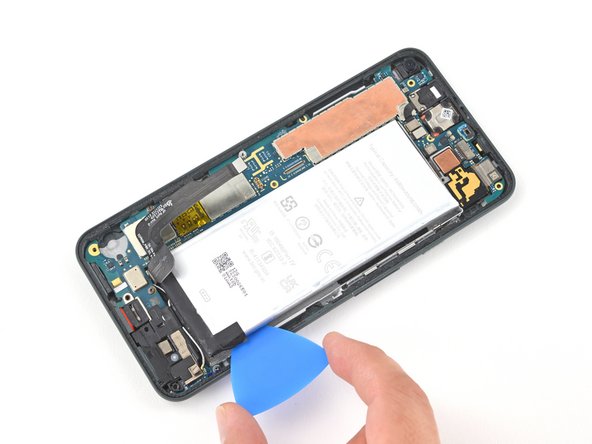
  • Insert a pick into the gap to the right of the battery and slide its tip underneath the battery.

  • Take care not to puncture or bend the battery with your tool—a punctured or bent battery may leak dangerous chemicals or cause a fire.

  • Slide the pick along the right side of the battery to slice through the adhesive securing it to the midframe.

  • Once the right side of the battery begins to separate from the midframe, leave an opening pick in the gap to keep the battery slightly raised.

  • Apply a few drops of isopropyl alcohol directly to the adhesive securing the battery to the midframe. Let the isopropyl penetrate the adhesive for 2-3 minutes.

Setze ein Plektrum in die Lücke rechts vom Akku und schiebe seine Spitze unter den Akku.

Achte darauf, den Akku nicht anzustechen oder zu verbiegen. Ein angestochener oder verbogener Akku kann gefährliche Chemikalien verlieren oder in Brand geraten.

Schiebe das Plektrum an der rechten Seite des Akkus entlangund trenne den Kleber auf, mit der er am Mittelrahmen befestigt ist.

Wenn sich der Akku an der rechten Seite abzulösen beginnt, setze ein Plektrum in den Spalt ein, damit der Akku leicht erhöht bleibt.

Tröpfle noch mehr Isopropylalkohol direkt an den Kleber zwischen Akku und Mittelrahmen. Lasse ihn 2 - 3 Minuten lang einwirken.

crwdns2944171:0crwdnd2944171:0crwdnd2944171:0crwdnd2944171:0crwdne2944171:0