crwdns2933423:0crwdne2933423:0

Sostituzione dello schermo del Google Pixel 6 Pro

crwdns2931529:0crwdnd2931529:0crwdnd2931529:0crwdnd2931529:06crwdnd2931529:0crwdne2931529:0

crwdns2936315:0crwdne2936315:0
crwdns2936321:0crwdne2936321:0
crwdns2931653:09crwdne2931653:0
Google Pixel 6 Pro Screen Replacement: crwdns2935265:00crwdnd2935265:01crwdnd2935265:02crwdne2935265:0 Google Pixel 6 Pro Screen Replacement: crwdns2935265:00crwdnd2935265:02crwdnd2935265:02crwdne2935265:0
  • If the adhesive becomes hard to cut, it has most likely cooled down. Use your iOpener or heat gun for 1-2 minutes to reheat it.

  • When you slice near the front facing camera, insert only the tip of the opening pick (~2-3 mm) to avoid damaging or smearing the camera.

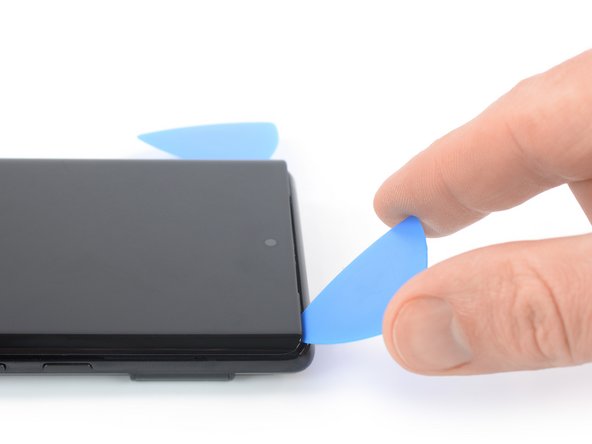
  • Insert a fourth opening pick at the top left corner of the screen.

  • Slide the opening pick along the top edge of the phone to slice the adhesive.

  • Leave the opening pick in the top right corner to prevent the adhesive from resealing.

Se l'adesivo diventa difficile da tagliare, molto probabilmente si è raffreddato. Usa il tuo iOpener o una pistola termica per 1-2 minuti per riscaldarlo.

Quando tagli vicino alla fotocamera frontale, inserisci solo la punta del plettro (circa 2-3 mm) per evitare di danneggiare o macchiare la fotocamera.

Inserisci un quarto plettro nell'angolo in alto a sinistra dello schermo.

Fai scorrere il plettro lungo il bordo superiore del telefono per tagliare l'adesivo.

Lascia il plettro nell'angolo in alto a destra per evitare che l'adesivo si riattacchi.

crwdns2944171:0crwdnd2944171:0crwdnd2944171:0crwdnd2944171:0crwdne2944171:0