crwdns2933423:0crwdne2933423:0

Reemplazo de la placa madre de Microsoft Surface Pro X

crwdns2931529:0crwdnd2931529:0crwdnd2931529:0crwdnd2931529:04crwdnd2931529:0crwdne2931529:0

crwdns2936315:0crwdne2936315:0
crwdns2936331:0crwdne2936331:0
crwdns2931653:012crwdne2931653:0
Microsoft Surface Pro X Motherboard Replacement: crwdns2935265:00crwdnd2935265:01crwdnd2935265:03crwdne2935265:0 Microsoft Surface Pro X Motherboard Replacement: crwdns2935265:00crwdnd2935265:02crwdnd2935265:03crwdne2935265:0 Microsoft Surface Pro X Motherboard Replacement: crwdns2935265:00crwdnd2935265:03crwdnd2935265:03crwdne2935265:0
  • Note that the second USB-C port shield may fling off of the frame when you detach it. You can place a finger on the shield to prevent it from flinging.

  • Repeat the previous step for the other corner of the shield closest to the left speaker recess.

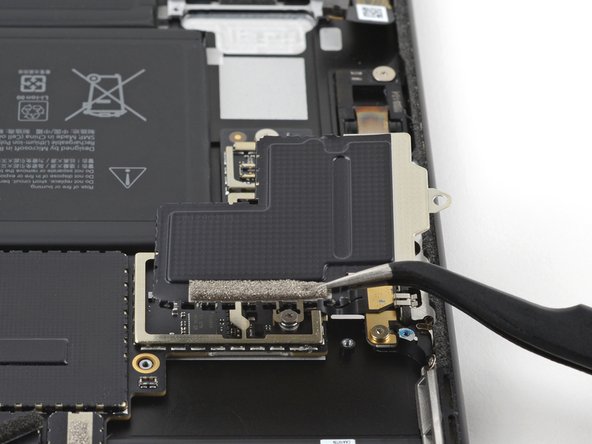
  • Continue prying up the edge of the shield closest to the left speaker recess until the shield detaches from the frame.

  • Remove the shield from the frame.

  • If the shield isn't completely detached from the frame, pry up additional areas on the edges of the shield.

Ten en cuenta que el escudo del segundo puerto USB-C puede salir despedido del marco cuando lo separes. Puede colocar un dedo sobre el protector para evitar que se suelte.

Repita el paso anterior para la otra esquina del protector más cercana al hueco del altavoz izquierdo.

Continúa levantando el borde de la pantalla más cercano al hueco del altavoz izquierdo hasta que la pantalla se separe del marco.

Retira la pantalla del marco.

Si el escudo no está completamente separado del marco, haga palanca en las zonas adicionales de los bordes del escudo.

crwdns2944171:0crwdnd2944171:0crwdnd2944171:0crwdnd2944171:0crwdne2944171:0