crwdns2933423:0crwdne2933423:0

Microsoft Surface Pro X Hauptplatine tauschen

crwdns2931529:0crwdnd2931529:0crwdnd2931529:0crwdnd2931529:04crwdnd2931529:0crwdne2931529:0

crwdns2936315:0crwdne2936315:0
crwdns2936319:0crwdne2936319:0
crwdns2931653:012crwdne2931653:0
Microsoft Surface Pro X Motherboard Replacement: crwdns2935265:00crwdnd2935265:01crwdnd2935265:03crwdne2935265:0 Microsoft Surface Pro X Motherboard Replacement: crwdns2935265:00crwdnd2935265:02crwdnd2935265:03crwdne2935265:0 Microsoft Surface Pro X Motherboard Replacement: crwdns2935265:00crwdnd2935265:03crwdnd2935265:03crwdne2935265:0
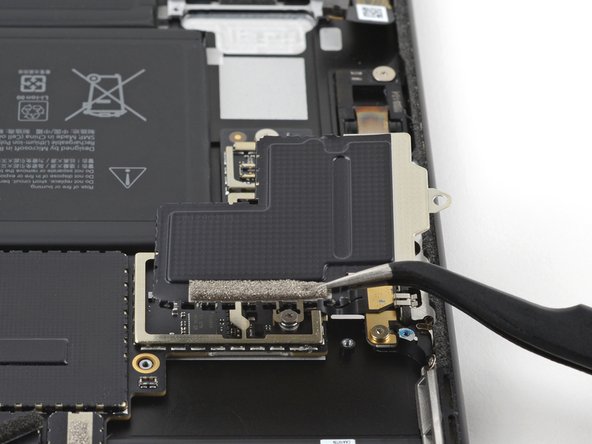
  • Note that the second USB-C port shield may fling off of the frame when you detach it. You can place a finger on the shield to prevent it from flinging.

  • Repeat the previous step for the other corner of the shield closest to the left speaker recess.

  • Continue prying up the edge of the shield closest to the left speaker recess until the shield detaches from the frame.

  • Remove the shield from the frame.

  • If the shield isn't completely detached from the frame, pry up additional areas on the edges of the shield.

Beachte, dass die Abschirmung des zweiten USB-C Anschlusses beim Ausbau herausgeschleudert werden kann. Lege einen Finger auf die Abschirmung, um dies zu verhindern.

Wiederhole den vorherigen Schritt für die andere Ecke der Abschirmung nahe an der Vertiefung für den linken Lautsprecher.

Heble solange weiter in der Nähe der Vertiefung für den linken Lautsprecher an der Kante der Abschirmung, bis sich die Abschirmung vom Rahmen löst.

Entferne die Abschirmung vom Rahmen.

Wenn sich die Abschirmung noch nicht ganz vom Rahmen gelöst hat, dann heble sie noch an weiteren Stellen am Rand der Abschirmung hoch.

crwdns2944171:0crwdnd2944171:0crwdnd2944171:0crwdnd2944171:0crwdne2944171:0