crwdns2933423:0crwdne2933423:0

Reemplazo de la pantalla del Xiaomi Redmi Note 9

crwdns2936315:0crwdne2936315:0
crwdns2936331:0crwdne2936331:0
crwdns2931653:08crwdne2931653:0
Xiaomi Redmi Note 9 Screen Replacement: crwdns2935265:00crwdnd2935265:01crwdnd2935265:03crwdne2935265:0 Xiaomi Redmi Note 9 Screen Replacement: crwdns2935265:00crwdnd2935265:02crwdnd2935265:03crwdne2935265:0 Xiaomi Redmi Note 9 Screen Replacement: crwdns2935265:00crwdnd2935265:03crwdnd2935265:03crwdne2935265:0
  • If the adhesive becomes hard to cut, it has most likely cooled down. Use your iOpener or heat gun to for 1-2 minutes to reheat it.

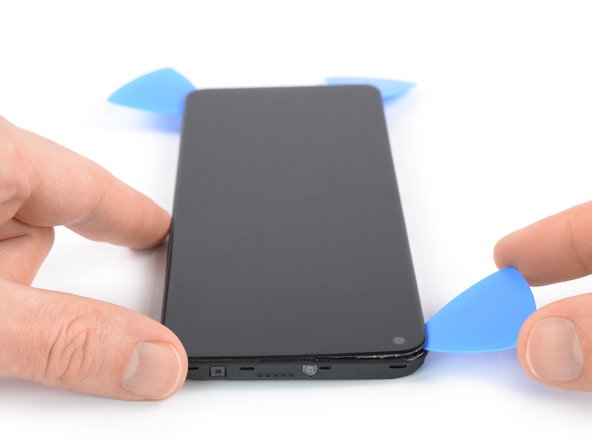
  • Insert a third opening pick underneath the bottom left corner of the screen.

  • Slide the opening pick along the left edge of the screen to slice the adhesive. Leave it in the top left corner to prevent the adhesive from resealing.

  • When you slice near the front facing camera, insert only the tip of the opening pick (about 3 to 4 mm) to avoid damaging or smearing the camera.

Si el adhesivo se vuelve difícil de cortar, lo más probable es que se haya enfriado. Utiliza el iOpener o la pistola de calor durante 1-2 minutos para recalentarlo.

Inserta una tercera púa de apertura debajo de la esquina inferior izquierda de la pantalla.

Desliza la púa de apertura a lo largo del borde izquierdo de la pantalla para cortar el adhesivo. Déjala en la esquina superior izquierda para evitar que el adhesivo se vuelva a sellar.

Cuando cortes cerca de la cámara frontal, inserta sólo la punta de la púa de apertura (unos 3 ó 4 mm) para evitar dañar o manchar la cámara.

crwdns2944171:0crwdnd2944171:0crwdnd2944171:0crwdnd2944171:0crwdne2944171:0