crwdns2933423:0crwdne2933423:0

iPhone 13 Taptic Engineの交換

crwdns2931527:0crwdnd2931527:0crwdnd2931527:0crwdnd2931527:0crwdne2931527:0

crwdns2935425:06crwdne2935425:0

crwdns2936315:0crwdne2936315:0
crwdns2936323:0crwdne2936323:0
crwdns2931653:06crwdne2931653:0
iPhone 13 Taptic Engine Replacement, Reassembly information: crwdns2935265:00crwdnd2935265:01crwdnd2935265:03crwdne2935265:0 iPhone 13 Taptic Engine Replacement, Reassembly information: crwdns2935265:00crwdnd2935265:02crwdnd2935265:03crwdne2935265:0 iPhone 13 Taptic Engine Replacement, Reassembly information: crwdns2935265:00crwdnd2935265:03crwdnd2935265:03crwdne2935265:0
Reassembly information
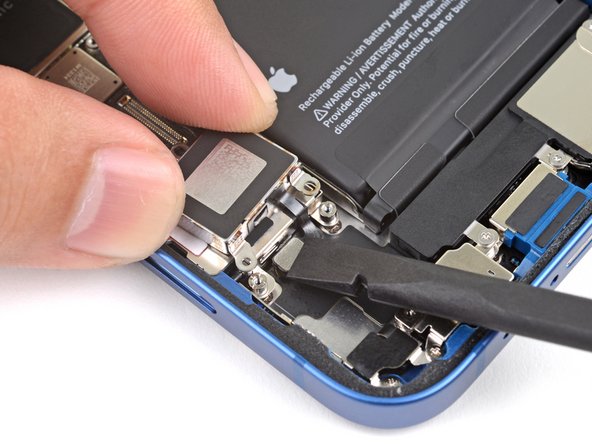
  • During reassembly, follow these steps to reconnect the Taptic Engine:

  • Place the Taptic Engine upside-down on the SIM card reader so that the Taptic Engine's ribbon cable faces its connector on the logic board.

  • Use the flat end of a spudger or the tip of your finger to reconnect the Taptic Engine press connector.

  • Flip the Taptic Engine back into its recess.

再組立ての際は、Taptic Engineを接続するために、次の手順に従ってください。

Taptic Engineのリボンケーブルがロジックボードのコネクタ側に向くように、Taptic EngineをSIMカードリーダーの上に上下逆さまに置いてください。

スパッジャーの平面側や指の先を使って、Taptic Engineのプレスコネクタを再接続してください。

Taptic Engineを角の定位置に戻します。

crwdns2944171:0crwdnd2944171:0crwdnd2944171:0crwdnd2944171:0crwdne2944171:0