crwdns2933423:0crwdne2933423:0

Remplacement du Taptic Engine de l'iPhone 13

crwdns2931527:0crwdnd2931527:0crwdnd2931527:0crwdnd2931527:0crwdne2931527:0

crwdns2935425:06crwdne2935425:0

crwdns2936315:0crwdne2936315:0
crwdns2936317:0crwdne2936317:0
crwdns2931653:06crwdne2931653:0
iPhone 13 Taptic Engine Replacement, Reassembly information: crwdns2935265:00crwdnd2935265:01crwdnd2935265:03crwdne2935265:0 iPhone 13 Taptic Engine Replacement, Reassembly information: crwdns2935265:00crwdnd2935265:02crwdnd2935265:03crwdne2935265:0 iPhone 13 Taptic Engine Replacement, Reassembly information: crwdns2935265:00crwdnd2935265:03crwdnd2935265:03crwdne2935265:0
Reassembly information
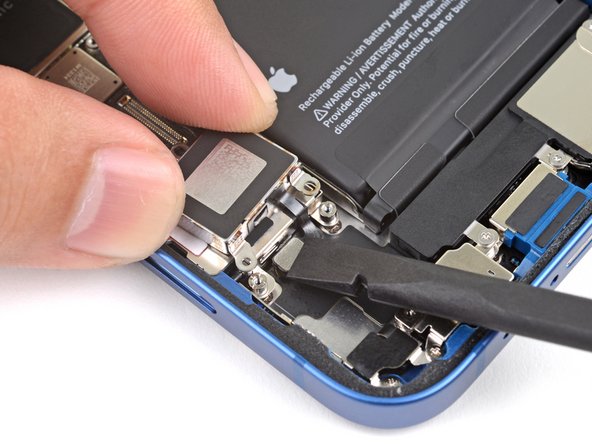
  • During reassembly, follow these steps to reconnect the Taptic Engine:

  • Place the Taptic Engine upside-down on the SIM card reader so that the Taptic Engine's ribbon cable faces its connector on the logic board.

  • Use the flat end of a spudger or the tip of your finger to reconnect the Taptic Engine press connector.

  • Flip the Taptic Engine back into its recess.

Lors du remontage, suivez ces étapes pour connecter le Taptic Engine :

Posez-le à l'envers sur le lecteur de carte SIM de façon que la nappe du Taptic Engine est en face de son connecteur sur la carte mère.

Prenez le bout plat de votre spatule ou le bout d'un doigt pour rebrancher le connecteur à emboîter du Taptic Engine.

Retournez le Taptic Engine pour le mettre à sa place.

crwdns2944171:0crwdnd2944171:0crwdnd2944171:0crwdnd2944171:0crwdne2944171:0