crwdns2933423:0crwdne2933423:0

iPad Pro 12.9" Displayeinheit

crwdns2931529:0crwdnd2931529:0crwdnd2931529:0crwdnd2931529:04crwdnd2931529:0crwdne2931529:0

crwdns2936315:0crwdne2936315:0
crwdns2936319:0crwdne2936319:0
crwdns2931653:026crwdne2931653:0
iPad Pro 12.9" Display Assembly Replacement: crwdns2935265:00crwdnd2935265:01crwdnd2935265:03crwdne2935265:0 iPad Pro 12.9" Display Assembly Replacement: crwdns2935265:00crwdnd2935265:02crwdnd2935265:03crwdne2935265:0 iPad Pro 12.9" Display Assembly Replacement: crwdns2935265:00crwdnd2935265:03crwdnd2935265:03crwdne2935265:0
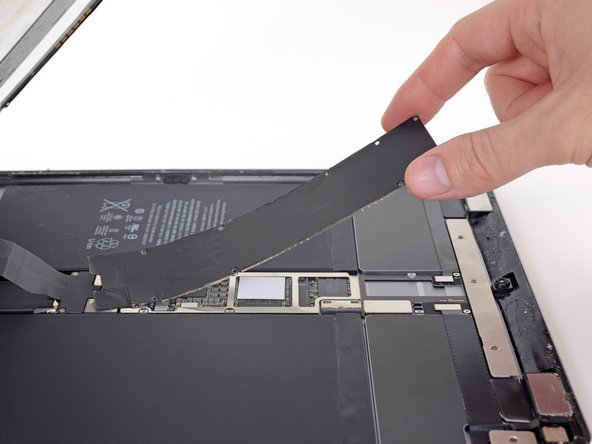
  • Lift the logic board EMI shield from the edge nearest the top of the iPad.

  • Peel up and remove the EMI shield from the logic board.

  • This takes a bit of force due to the many tiny clips securing the shield, and the shield may deform slightly. That's okay—try to keep the deformation to a minimum, and it will lay flat when you reinstall it and screw it down.

  • Remove the logic board EMI shield.

Hebe die EMI-Abschirmung an Rand nahe an der Oberkante des iPads hoch.

Löse die EMI-Abschirmung vom Logic Board ab und entferne sie.

Die Abschirmung ist mit einigen Clips befestigt, deswegen benötigst du recht viel Kraft und sie kann sich dabei ein wenig verbiegen. Das ist nicht schlimm - passe nur auf, dass sie nicht zu stark verbogen wird. Die Abschirmung wird beim Einbau wieder flach, wenn sie festgeschraubt wird.

Entferne die EMI-Abschirmung des Logic Boards.

crwdns2944171:0crwdnd2944171:0crwdnd2944171:0crwdnd2944171:0crwdne2944171:0