crwdns2933423:0crwdne2933423:0

ロジクール(Logitech)MX Anywhere 3 バッテリーの交換

crwdns2931527:0crwdnd2931527:0crwdnd2931527:0crwdnd2931527:0crwdne2931527:0

crwdns2935425:07crwdne2935425:0

crwdns2936315:0crwdne2936315:0
crwdns2936323:0crwdne2936323:0
crwdns2931653:07crwdne2931653:0
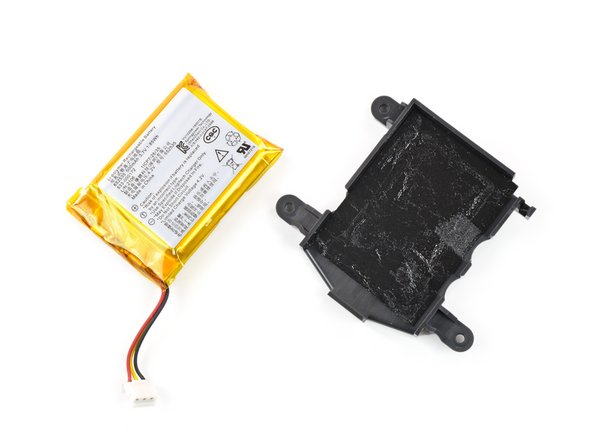
Logitech MX Anywhere 3 Battery Replacement, Remove the battery: crwdns2935265:00crwdnd2935265:01crwdnd2935265:03crwdne2935265:0 Logitech MX Anywhere 3 Battery Replacement, Remove the battery: crwdns2935265:00crwdnd2935265:02crwdnd2935265:03crwdne2935265:0 Logitech MX Anywhere 3 Battery Replacement, Remove the battery: crwdns2935265:00crwdnd2935265:03crwdnd2935265:03crwdne2935265:0
Remove the battery
  • Try not to bend, crease, deform, poke, or puncture the battery with your tool—a damaged battery is a potential fire hazard.

  • Insert the flat end of a spudger between the battery and its housing through one of the cutouts.

  • Pull up to peel the battery away from the adhesive.

  • Remove the battery.

  • To install a new battery:

  • Use a spudger or your fingers to peel any old adhesive off of the battery housing. The old adhesive shouldn't leave any residue.

  • If your new battery doesn't come with preinstalled adhesive, place a couple strips of double-sided tape into the battery housing.

  • Orient your new battery so its cables route through the cutout in the corner of the housing. Press the battery firmly into place to secure it.

工具でバッテリーを曲げたり、折り目をつけたり、変形させたり、突いたり、穴を開けたりしないでください。

スパッジャーの平面側先端をバッテリーとハウジングの切り欠きの一つの間に差し込みます。

バッテリーを接着剤から乖離します。

バッテリーを取り出します。

新しいバッテリーのインストール方法

スパッジャーか指を使って、バッテリーハウジングから古い接着剤をはがします。古い接着剤を全て除去してください。

新しいバッテリーにあらかじめ接着剤が付属していない場合は、両面テープを2、3本、バッテリーの筐体に貼り付けます。

新しいバッテリーのケーブルがハウジングの 角の切り欠きを通るようにします。バッテリーをしっかりと押し込んで固定します。

crwdns2944171:0crwdnd2944171:0crwdnd2944171:0crwdnd2944171:0crwdne2944171:0