crwdns2933423:0crwdne2933423:0

Remplacement de la batterie du Samsung Galaxy Note 10+ 5G

crwdns2935425:03crwdne2935425:0

crwdns2936315:0crwdne2936315:0
crwdns2936317:0crwdne2936317:0
crwdns2931653:03crwdne2931653:0
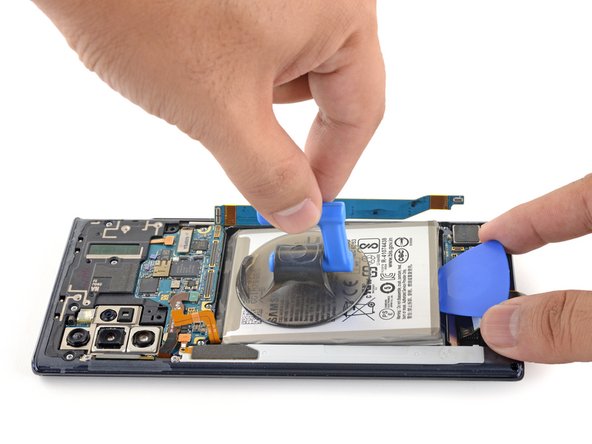
Samsung Galaxy Note10+ 5G Battery Replacement, Remove the battery: crwdns2935265:00crwdnd2935265:01crwdnd2935265:03crwdne2935265:0 Samsung Galaxy Note10+ 5G Battery Replacement, Remove the battery: crwdns2935265:00crwdnd2935265:02crwdnd2935265:03crwdne2935265:0 Samsung Galaxy Note10+ 5G Battery Replacement, Remove the battery: crwdns2935265:00crwdnd2935265:03crwdnd2935265:03crwdne2935265:0
Remove the battery
  • Apply a suction cup to the back of the battery.

  • Pull up on the suction cup with strong, steady force to begin to separate the battery from the frame.

  • If this is difficult, apply a few more drops of isopropyl alcohol underneath the battery, let it sit for two minutes, and try again.

  • Insert the point of an opening pick into the gap created between the battery and frame.

  • Don't insert the opening pick more than halfway or you risk damaging the fingerprint sensor underneath.

  • Pull up on the suction cup to remove the battery.

  • If you used isopropyl alcohol, wait ten minutes before installing the new battery to allow the alcohol to completely evaporate.

  • When you're reassembling your phone, remove the old adhesive and apply stretch release adhesive strips, double sided adhesive tape, or pre-cut adhesive to secure the new battery.

Appliquez une ventouse sur la coque de la batterie.

Tirez fortement et constamment sur la ventouse pour commencer à séparer la batterie du châssis.

Si vous avez du mal, déposez quelques gouttes supplémentaires d'alcool isopropylique sous la batterie, laissez agir pendant deux minutes, puis réessayez.

Insérez la pointe d'un médiator dans l'espace que vous avez créé entre la batterie et le châssis.

N'insérez pas plus de la moitié du médiator, vous risquez sinon d'endommager le lecteur d'empreintes digitales qui se trouve en dessous.

Tirez sur la ventouse pour retirer la batterie.

La batterie sort sans que vous deviez forcer, une fois que l'alcool isopropylique a fait son effet sur l'adhésif.

Lors du remontage, ôtez les résidus d'adhésif et posez des bandes adhésives étirables, du ruban adhésif double-face ou de l'adhésif prédécoupé pour fixer la nouvelle batterie.

[title] Remove the battery
[* black] Apply a suction cup to the back of the battery.
[* black] Pull up on the suction cup with strong, steady force to begin to separate the battery from the frame.
[* icon_note] If this is difficult, apply a few more drops of isopropyl alcohol underneath the battery, let it sit for two minutes, and try again.
[* black] Insert the point of an opening pick into the gap created between the battery and frame.
[* icon_caution] Don't insert the opening pick more than halfway or you risk damaging the fingerprint sensor underneath.
[* black] Pull up on the suction cup to remove the battery.
- [* icon_note] The battery will come out without much force once the isopropyl alcohol has adequately penetrated the battery adhesive.
+[* black] If you used isopropyl alcohol, wait ten minutes before installing the new battery to allow the alcohol to completely evaporate.
[* icon_reminder] When you're reassembling your phone, remove the old adhesive and apply [guide|137171|stretch release adhesive strips], double sided adhesive tape, or [guide|113604|pre-cut adhesive|new_window=true] to secure the new battery.

crwdns2944171:0crwdnd2944171:0crwdnd2944171:0crwdnd2944171:0crwdne2944171:0