crwdns2935425:03crwdne2935425:0
crwdns2931653:03crwdne2931653:0


Remove the keyboard screws
-
Remove the PCMCIA cover by pushing out on the top edge and rotating downward to release the hard drive.
-
Remove the Hard disk drive by sliding the unlock button and pushing it out. The HDD should be removed after the Battery and the PCMCIA cover to avoid damage to the plastic clips.
-
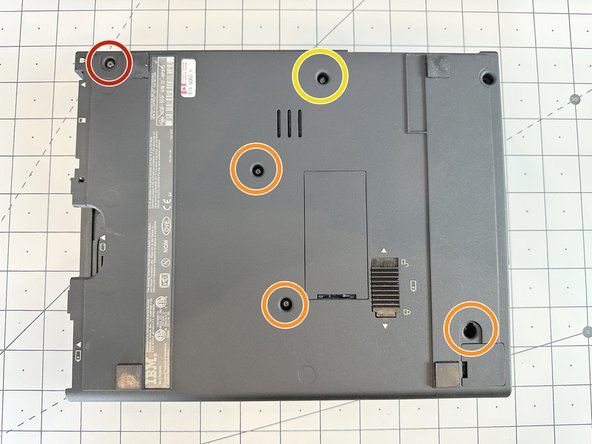
Flip the laptop over so the screen hinge is facing away from you. Remove the 8mm (BH) screw at the top left with a T6 Torx bit.
-
Remove the three (3) 6mm (BC) screws from the middle and bottom right with a T6 Torx bit.
-
Remove the 10mm (BE) screw from the top center with a T6 Torx bit.
-
Remove the four (4) 3mm (BF) screws freom the front of the lowe case using a T1 Torx bit.
| [title] Remove the keyboard screws | |
| [* light_blue] Remove the PCMCIA cover by pushing out on the top edge and rotating downward to release the hard drive. | |
| - | [* violet] Remove the Hard disk drive by sliding the unlock button and pushing it out. |
| + | [* violet] Remove the Hard disk drive by sliding the unlock button and pushing it out. The HDD should be removed after the Battery and the PCMCIA cover to avoid damage to the plastic clips. |
| [* icon_caution] These laptops are notorious for the rubber paint liquifying over time. This may be dificult to do, but be careful to not break the case plastics or the plastic drive harness. | |
| - | [* red] Flip the laptop over so the screen hinge is facing away from you. Remove the 8mm screw at the top left with a T6 Torx bit. |
| - | [* orange] Remove the three (3) 6mm screws from the middle and bottom right with a T6 Torx bit. |
| - | [* yellow] Remove the 10mm screw from the top center with a T6 Torx bit. |
| - | [* green] Remove the four (4) |
| + | [* red] Flip the laptop over so the screen hinge is facing away from you. Remove the 8mm (***BH***) screw at the top left with a T6 Torx bit. |
| + | [* orange] Remove the three (3) 6mm (***BC***) screws from the middle and bottom right with a T6 Torx bit. |
| + | [* yellow] Remove the 10mm (***BE***) screw from the top center with a T6 Torx bit. |
| + | [* green] Remove the four (4) 3mm (***BF***) screws freom the front of the lowe case using a T1 Torx bit. |
| [* icon_caution] These T1 screws are fragile. Don't lose them and do NOT try to use any other type of driver to remove them. They can be easily stripped. |
crwdns2944171:0crwdnd2944171:0crwdnd2944171:0crwdnd2944171:0crwdne2944171:0