crwdns2933423:0crwdne2933423:0

Microsoft Surface Pro 6 Vervanging van het koellichaam

crwdns2931529:0crwdnd2931529:0crwdnd2931529:0crwdnd2931529:09crwdnd2931529:0crwdne2931529:0

crwdns2936315:0crwdne2936315:0
crwdns2936313:0crwdne2936313:0
crwdns2931653:04crwdne2931653:0
Microsoft Surface Pro 6 Heat Sink Replacement, Remove the heat sink: crwdns2935265:00crwdnd2935265:01crwdnd2935265:02crwdne2935265:0 Microsoft Surface Pro 6 Heat Sink Replacement, Remove the heat sink: crwdns2935265:00crwdnd2935265:02crwdnd2935265:02crwdne2935265:0
Remove the heat sink
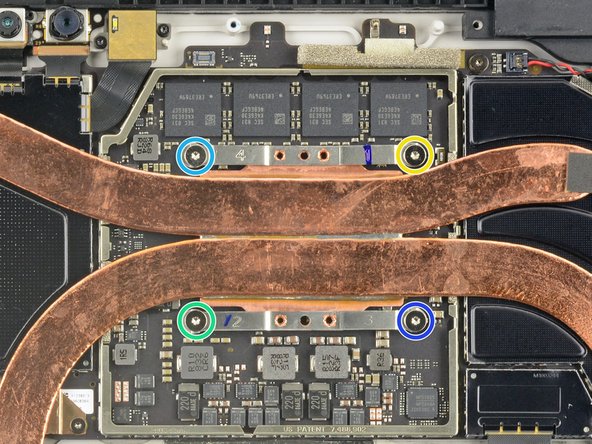
  • Remove the ten Torx screws securing the heat sink:

  • Six 2.6 mm-long T3 screws

  • Four 3.3 mm-long T5 screws

  • During reassembly, tighten the heat sink screws in the following criss-cross pattern, one turn at a time, until they're tight:

  • Screw 1

  • Screw 2

  • Screw 3

  • Screw 4

Verwijder de tien Torx-schroeven waarmee het koellichaam is bevestigd:

Zes 2.6 mm lange T3 schroeven

Vier 3.3 mm lange T5 schroeven

Zorg dat je de schroeven in het koellichaam, bij het weer in elkaar zetten van je toestel, in het volgende criss-cross patroon aandraait tot deze strak vastzitten:

Schroef 1

Schroef 2

Schroef 3

Schroef 4

crwdns2944171:0crwdnd2944171:0crwdnd2944171:0crwdnd2944171:0crwdne2944171:0