crwdns2933423:0crwdne2933423:0

Microsoft Surface Pro 6のヒートシンクの交換

crwdns2931529:0crwdnd2931529:0crwdnd2931529:0crwdnd2931529:09crwdnd2931529:0crwdne2931529:0

crwdns2935425:01crwdne2935425:0

crwdns2936315:0crwdne2936315:0
crwdns2936323:0crwdne2936323:0
crwdns2931653:01crwdne2931653:0
Microsoft Surface Pro 6 Heat Sink Replacement, Remove the heat sink shield: crwdns2935265:00crwdnd2935265:01crwdnd2935265:02crwdne2935265:0 Microsoft Surface Pro 6 Heat Sink Replacement, Remove the heat sink shield: crwdns2935265:00crwdnd2935265:02crwdnd2935265:02crwdne2935265:0
Remove the heat sink shield
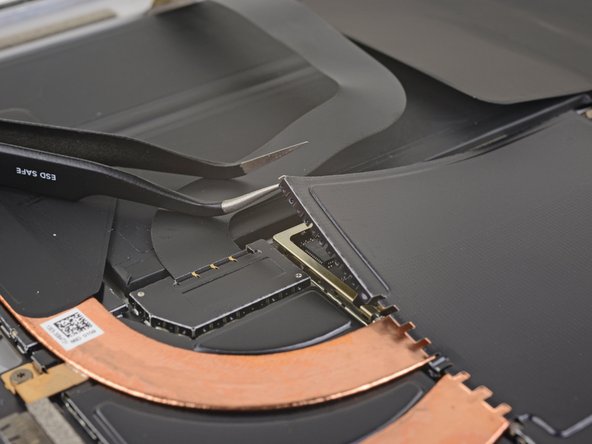
  • Insert one point of a pair of pointed tweezers into a gap in the corner of the EMI shield covering the heat sink.

  • Use the tweezers to pry the EMI shield away from the motherboard as much as you can without bending it. Do not remove it yet.

  • Try not to deform the shield too much—you will need to reinstall it during reassembly.

  • Take care not to puncture the battery with the tweezers while working on this shield.

ヒートシンクを覆っているEMIシールド角の隙間に、 先の尖ったピンセットの先を差し込みます。

ピンセットを使って、EMIシールドを曲げないように、できるだけマザーボードからこじ開けるようにします。まだ取り外さないでください。

再組み立ての際にシールドを再装着する必要があるため、あまり変形させないようにしてください。

このシールドの作業中、ピンセットでバッテリーに穴を開けないように注意してください。

crwdns2944171:0crwdnd2944171:0crwdnd2944171:0crwdnd2944171:0crwdne2944171:0