crwdns2933423:0crwdne2933423:0

iPad mini 5 Wi-Fi 磁気センサーの交換

crwdns2931527:0crwdnd2931527:0crwdnd2931527:0crwdnd2931527:0crwdne2931527:0

crwdns2935425:05crwdne2935425:0

crwdns2936315:0crwdne2936315:0
crwdns2936323:0crwdne2936323:0
crwdns2931653:05crwdne2931653:0
iPad mini 5 Wi-Fi Magnetic Sensor Replacement, Remove the magnetic sensor cable: crwdns2935265:00crwdnd2935265:01crwdnd2935265:02crwdne2935265:0 iPad mini 5 Wi-Fi Magnetic Sensor Replacement, Remove the magnetic sensor cable: crwdns2935265:00crwdnd2935265:02crwdnd2935265:02crwdne2935265:0
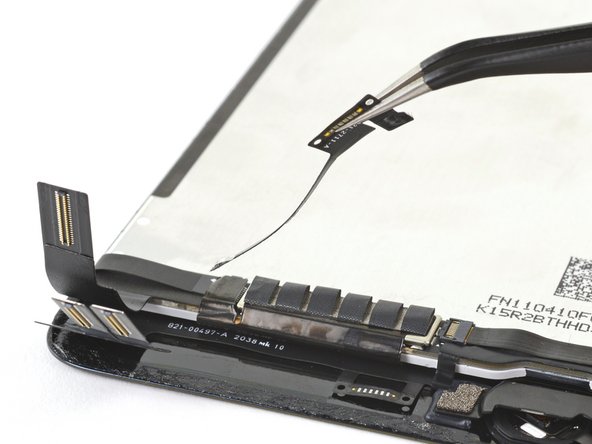
Remove the magnetic sensor cable
  • When the solder on the solder pads is melted, use a pair of tweezers to separate the magnetic sensor from the screen.

  • If the solder isn't melted, apply more heat and try again.

  • When the area is cool enough to touch, remove the polyimide tape.

  • Use a pair of tweezers to remove the magnetic sensor cable.

  • The magnetic sensor cable is secured to the screen with light adhesive. Remove the magenetic sensor cable slowly to avoid damaging the cable under it.

  • During reassembly, apply a piece of polyimide tape under the solder pads while soldering the magnetic sensor to avoid damaging the screen.

はんだパッドのはんだが溶けたら、ピンセットで磁気センサーをスクリーンから切り離します。

はんだが溶けていない場合は、さらに熱を加え、もう一度試してみてください。

触ってみて十分に冷えたら、ポリイミドテープを剥がします。

ピンセットを使って、磁気センサーケーブルを取り外します。

磁気センサーケーブルは、スクリーンに軽粘着剤で固定されています。磁気センサーケーブルは、その下のケーブルを傷つけないように、ゆっくりと取り外してください。

再組立の際、磁気センサーのはんだ付けの際に、スクリーンを傷つけないように、半田パッドの下にポリイミドテープを貼ってください。

crwdns2944171:0crwdnd2944171:0crwdnd2944171:0crwdnd2944171:0crwdne2944171:0