crwdns2933423:0crwdne2933423:0

Google Stadia 컨트롤러 마더보드 어셈블리 교체

crwdns2931529:0crwdnd2931529:0crwdnd2931529:0crwdnd2931529:05crwdnd2931529:0crwdne2931529:0

crwdns2936315:0crwdne2936315:0
crwdns2936325:0crwdne2936325:0
crwdns2931653:04crwdne2931653:0
Google Stadia Controller Motherboard Assembly Replacement: crwdns2935265:00crwdnd2935265:01crwdnd2935265:03crwdne2935265:0 Google Stadia Controller Motherboard Assembly Replacement: crwdns2935265:00crwdnd2935265:02crwdnd2935265:03crwdne2935265:0 Google Stadia Controller Motherboard Assembly Replacement: crwdns2935265:00crwdnd2935265:03crwdnd2935265:03crwdne2935265:0
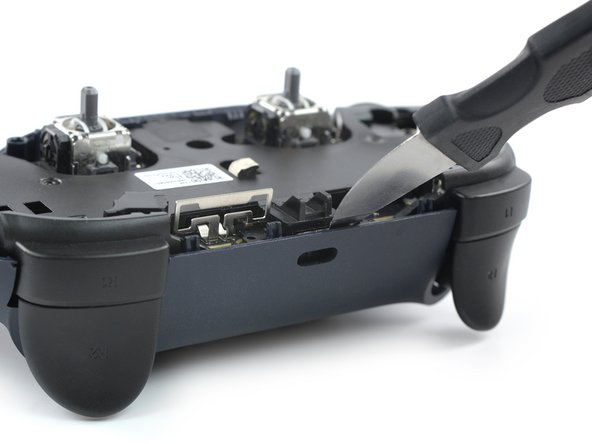
  • Insert a Jimmy at the top edge of the Google Stadia controller just above the charging port.

  • Pry up the top edge of the motherboard assembly by tilting the Jimmy downwards.

  • The charging port is clamped into an opening in the rear cover of the stadia controller. Make sure the charging port is not stuck in its recess during the prying procedure.

  • During reassembly make sure the charging port snaps back into its recess.

Google Stadia 컨트롤러의 상단 가장자리 충전 포트 바로 위에 Jimmy/지미를 끼우세요.

지미를 아래쪽으로 기울여 마더보드 어셈블리의 상단 가장자리를 비집어 올리세요.

충전 포트는 Stadia 컨트롤러의 후면 커버에 있는 구멍에 고정되어 있습니다. 들어 올리는 과정에서 충전 포트가 홈에 끼어 있지 않도록 주의하세요.

재조립하는 동안 충전 포트가 다시 홈에 끼워지는지 확인하세요.

crwdns2944171:0crwdnd2944171:0crwdnd2944171:0crwdnd2944171:0crwdne2944171:0