crwdns2933423:0crwdne2933423:0

Google Stadia コントローラー マザーボードアセンブリの交換

crwdns2931529:0crwdnd2931529:0crwdnd2931529:0crwdnd2931529:05crwdnd2931529:0crwdne2931529:0

crwdns2936315:0crwdne2936315:0
crwdns2936323:0crwdne2936323:0
crwdns2931653:04crwdne2931653:0
Google Stadia Controller Motherboard Assembly Replacement: crwdns2935265:00crwdnd2935265:01crwdnd2935265:03crwdne2935265:0 Google Stadia Controller Motherboard Assembly Replacement: crwdns2935265:00crwdnd2935265:02crwdnd2935265:03crwdne2935265:0 Google Stadia Controller Motherboard Assembly Replacement: crwdns2935265:00crwdnd2935265:03crwdnd2935265:03crwdne2935265:0
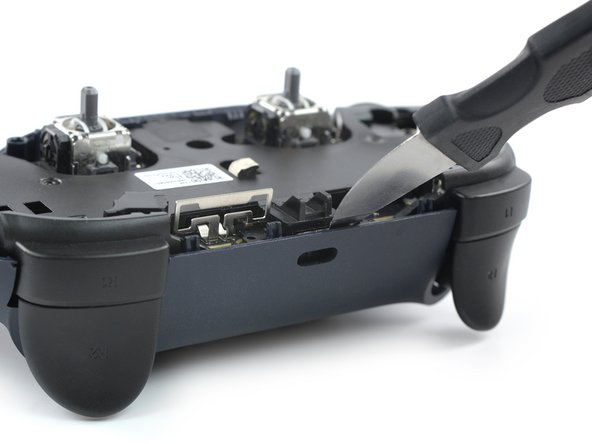
  • Insert a Jimmy at the top edge of the Google Stadia controller just above the charging port.

  • Pry up the top edge of the motherboard assembly by tilting the Jimmy downwards.

  • The charging port is clamped into an opening in the rear cover of the stadia controller. Make sure the charging port is not stuck in its recess during the prying procedure.

  • During reassembly make sure the charging port snaps back into its recess.

Google Stadiaコントローラの上端、充電ポートのすぐ上にJimmyを差し込みます。

Jimmyを下に傾けてマザーボードアセンブリの上端をこじります。

充電ポートは、スタディアコントローラのリアカバーの開口部に固定されています。こじ開ける際、充電ポートが凹みで詰まっていないことを確認してください。

再組み立ての際、充電ポートが凹みにカチッと装着していることを確認してください。

crwdns2944171:0crwdnd2944171:0crwdnd2944171:0crwdnd2944171:0crwdne2944171:0