crwdns2933423:0crwdne2933423:0

Changement ensemble carte mère manette Google Stadia

crwdns2931529:0crwdnd2931529:0crwdnd2931529:0crwdnd2931529:05crwdnd2931529:0crwdne2931529:0

crwdns2936315:0crwdne2936315:0
crwdns2936317:0crwdne2936317:0
crwdns2931653:04crwdne2931653:0
Google Stadia Controller Motherboard Assembly Replacement: crwdns2935265:00crwdnd2935265:01crwdnd2935265:03crwdne2935265:0 Google Stadia Controller Motherboard Assembly Replacement: crwdns2935265:00crwdnd2935265:02crwdnd2935265:03crwdne2935265:0 Google Stadia Controller Motherboard Assembly Replacement: crwdns2935265:00crwdnd2935265:03crwdnd2935265:03crwdne2935265:0
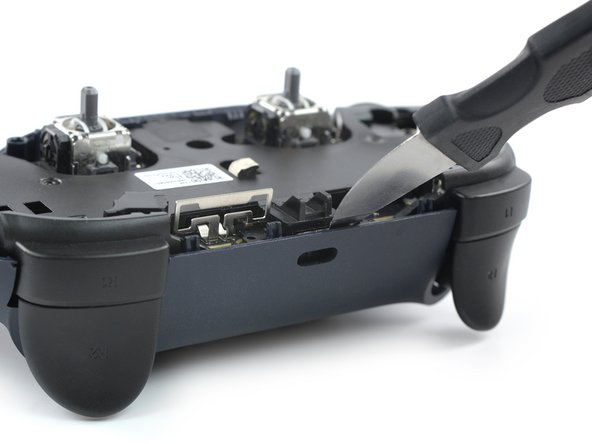
  • Insert a Jimmy at the top edge of the Google Stadia controller just above the charging port.

  • Pry up the top edge of the motherboard assembly by tilting the Jimmy downwards.

  • The charging port is clamped into an opening in the rear cover of the stadia controller. Make sure the charging port is not stuck in its recess during the prying procedure.

  • During reassembly make sure the charging port snaps back into its recess.

Insérez un Jimmy dans le bord supérieur de la manette Google Stadia, juste au-dessus du port de charge.

Faites levier sur le bord supérieur de l'ensemble carte mère en faisant pivoter le Jimmy vers le bas.

Le port de charge est coincé dans une encoche de la coque arrière de la manette Stadia. Assurez-vous que le port de charge n'est pas coincé dans son encoche pendant que vous faites levier.

Lors du remontage, veillez à ce que le port de charge s'emboîte à nouveau dans son encoche.

crwdns2944171:0crwdnd2944171:0crwdnd2944171:0crwdnd2944171:0crwdne2944171:0