crwdns2933423:0crwdne2933423:0

Google Stadia Controller Motherboard-Baugruppe tauschen

crwdns2931529:0crwdnd2931529:0crwdnd2931529:0crwdnd2931529:05crwdnd2931529:0crwdne2931529:0

crwdns2936315:0crwdne2936315:0
crwdns2936319:0crwdne2936319:0
crwdns2931653:04crwdne2931653:0
Google Stadia Controller Motherboard Assembly Replacement: crwdns2935265:00crwdnd2935265:01crwdnd2935265:03crwdne2935265:0 Google Stadia Controller Motherboard Assembly Replacement: crwdns2935265:00crwdnd2935265:02crwdnd2935265:03crwdne2935265:0 Google Stadia Controller Motherboard Assembly Replacement: crwdns2935265:00crwdnd2935265:03crwdnd2935265:03crwdne2935265:0
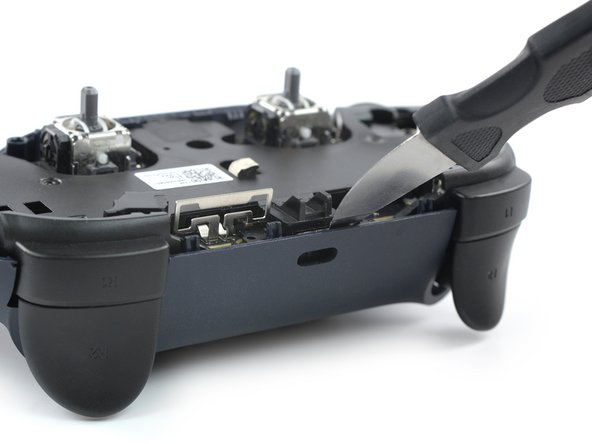
  • Insert a Jimmy at the top edge of the Google Stadia controller just above the charging port.

  • Pry up the top edge of the motherboard assembly by tilting the Jimmy downwards.

  • The charging port is clamped into an opening in the rear cover of the stadia controller. Make sure the charging port is not stuck in its recess during the prying procedure.

  • During reassembly make sure the charging port snaps back into its recess.

Setze einen Jimmy an der Oberkante des Google Stadia Controllers direkt oberhalb des Ladeanschlusses ein.

Heble die Oberkante der Motherboard-Baugruppe hoch, in dem du den Jimmy nach unten kippst.

Der Ladeanschluss ist in eine Öffnung in der Rückabdeckung des Stadia Controllers eingeklemmt. Achte darauf, das der Ladeanschluss beim Hebeln nicht in seiner Vertiefung hängen bleibt.

Stelle beim Wiederzusammenbau sicher, dass der Ladeanschluss wieder in seine Vertiefung einrastet.

crwdns2944171:0crwdnd2944171:0crwdnd2944171:0crwdnd2944171:0crwdne2944171:0