crwdns2933423:0crwdne2933423:0

Remplacement de l'écran du Samsung Galaxy Note20 Ultra

crwdns2936315:0crwdne2936315:0
crwdns2936317:0crwdne2936317:0
crwdns2931653:04crwdne2931653:0
Samsung Galaxy Note20 Ultra Screen Replacement, Separate the perimeter adhesive: crwdns2935265:00crwdnd2935265:01crwdnd2935265:03crwdne2935265:0 Samsung Galaxy Note20 Ultra Screen Replacement, Separate the perimeter adhesive: crwdns2935265:00crwdnd2935265:02crwdnd2935265:03crwdne2935265:0 Samsung Galaxy Note20 Ultra Screen Replacement, Separate the perimeter adhesive: crwdns2935265:00crwdnd2935265:03crwdnd2935265:03crwdne2935265:0
Separate the perimeter adhesive
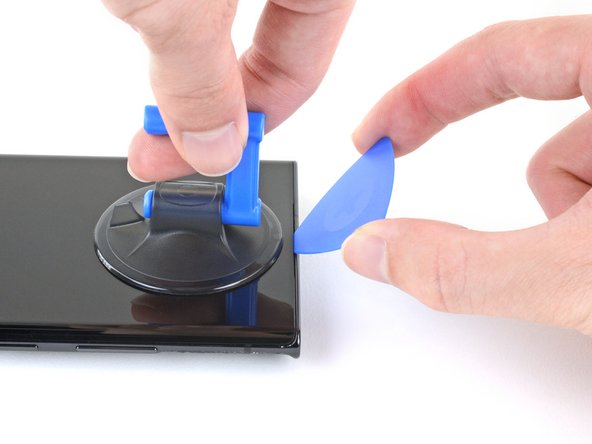
  • Apply a suction cup to the heated top edge of the screen, as close to the edge as possible.

  • If your screen is badly cracked, covering it with a layer of clear packing tape may allow the suction cup to adhere. Alternatively, very strong tape may be used instead of the suction cup. If all else fails, you can superglue the suction cup to the broken screen.

  • Pull up on the suction cup with a steady force to create a gap between the screen and the frame.

  • Depending on the age of your phone, this may be difficult. If you are having trouble creating a gap for the opening pick, apply more heat to the edge and try again. You may need to repeat this step multiple times.

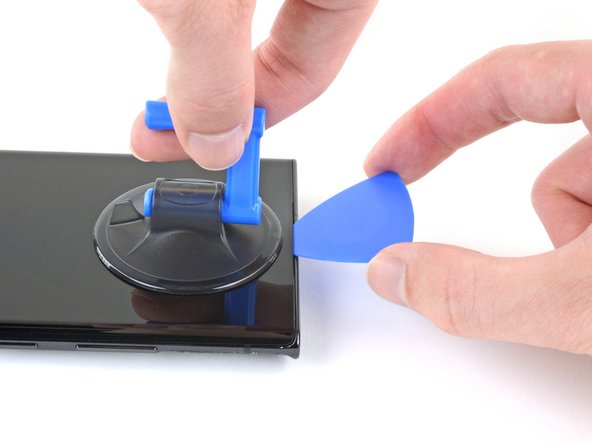
  • Insert the tip of an opening pick into the gap at a steep angle. Push down the opening pick so that it is level with the screen.

  • Make sure the opening pick slides over the front-facing camera and is not pushing against it.

  • Leave the opening pick in the gap to prevent the adhesive from re-sealing.

Appliquez une ventouse sur le bord supérieur chauffé de l'écran, aussi près que possible du bord.

Si votre écran est très fissuré, le recouvrir d'une couche d'adhésif d'emballage transparent peut permettre à la ventouse d'adhérer. Alternativement, un ruban très résistant peut être utilisé à la place de la ventouse. Si tout le reste échoue, vous pouvez coller la ventouse sur l'écran cassé.

Tirez sur la ventouse avec une force constante pour créer un espace entre l'écran et le châssis.

Selon l'âge de votre téléphone, cela peut être difficile. Si vous ne parvenez pas à créer un espace pour le médiator, appliquez plus de chaleur sur le bord et réessayez. Vous devrez peut-être répéter cette étape plusieurs fois.

Insérez la pointe d'un médiator dans l'espace en l'inclinant. Appuyez sur le médiator pour qu'il soit au niveau de l'écran.

Assurez-vous que le médiator glisse sur la caméra frontale et ne pousse pas contre elle.

Laissez le médiator dans l'espace pour empêcher l'adhésif de se refermer.

crwdns2944171:0crwdnd2944171:0crwdnd2944171:0crwdnd2944171:0crwdne2944171:0