crwdns2933423:0crwdne2933423:0

Remplacement de la pile du Drummond Pipet Aid XL

crwdns2936315:0crwdne2936315:0
crwdns2936317:0crwdne2936317:0
crwdns2931653:02crwdne2931653:0
Drummond Pipet Aid XL Battery Replacement, Remove the noise piece and plastic housing: crwdns2935265:00crwdnd2935265:01crwdnd2935265:03crwdne2935265:0 Drummond Pipet Aid XL Battery Replacement, Remove the noise piece and plastic housing: crwdns2935265:00crwdnd2935265:02crwdnd2935265:03crwdne2935265:0 Drummond Pipet Aid XL Battery Replacement, Remove the noise piece and plastic housing: crwdns2935265:00crwdnd2935265:03crwdnd2935265:03crwdne2935265:0
Remove the noise piece and plastic housing
  • Push in on the button near the nosepiece and turn the nosepiece counterclockwise until it pulls free from the head of the pipet aid.

  • Using a large philips screw driver, remove the four screws from the handle. *Note the two different sizes of screws (the smaller one will go into the neck of the Pipet Aid.)

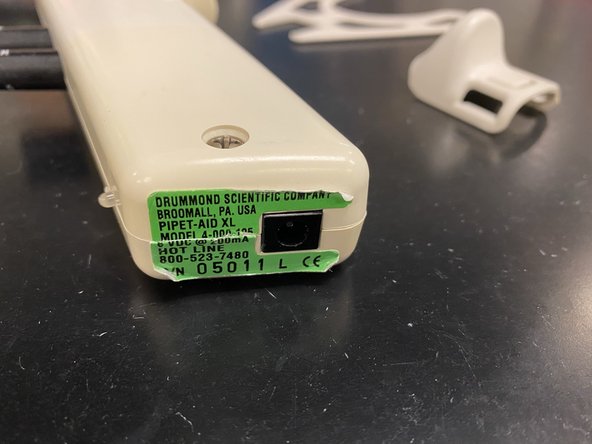
  • Cut the identification sticker down the middle or pull off to allow the housing to come apart.

  • Pull apart the plastic housing *the charging port will most likely get stuck to the housing, simply pull off the holder.

  • Be aware the mid-handle buttons might fly off as they are spring loaded! Secure these by taping to the back of the housing before completely pulling it apart.

Appuyez sur le bouton près de l'embout nasal et tournez l'embout nasal dans le sens inverse des aiguilles d'une montre jusqu'à ce qu'il se dégage de la tête de l'auxiliaire de pipetage.

À l'aide d'un grand tournevis cruciforme, retirez les quatre vis de la poignée. *Notez les deux tailles de vis différentes (la plus petite ira dans le col du Pipet Aid.)

Coupez l'autocollant d'identification au milieu ou retirez-le pour permettre au boîtier de se détacher.

Séparez le boîtier en plastique * le port de charge restera probablement collé au boîtier, retirez simplement le support.

Sachez que les boutons du milieu de la poignée peuvent s'envoler car ils sont à ressort ! Fixez-les en collant à l'arrière du boîtier avant de le séparer complètement.

crwdns2944171:0crwdnd2944171:0crwdnd2944171:0crwdnd2944171:0crwdne2944171:0