crwdns2933423:0crwdne2933423:0

Touch Activated Lamp Transistor Replacement

crwdns2935425:05crwdne2935425:0

crwdns2936315:0crwdne2936315:0
crwdns2936325:0crwdne2936325:0
crwdns2931653:05crwdne2931653:0
Touch Activated Lamp Transistor Replacement: crwdns2935265:00crwdnd2935265:01crwdnd2935265:03crwdne2935265:0 Touch Activated Lamp Transistor Replacement: crwdns2935265:00crwdnd2935265:02crwdnd2935265:03crwdne2935265:0 Touch Activated Lamp Transistor Replacement: crwdns2935265:00crwdnd2935265:03crwdnd2935265:03crwdne2935265:0
  • Locate the transistor.

  • Note the location of the three pins of the transistor.

  • Soldering irons can heat up to excess of 500 degrees Fahrenheit. Take caution when soldering. If you need more information on soldering check out How to Solder and Desolder Connections

  • In this image I am using a pencil to model a soldering iron.

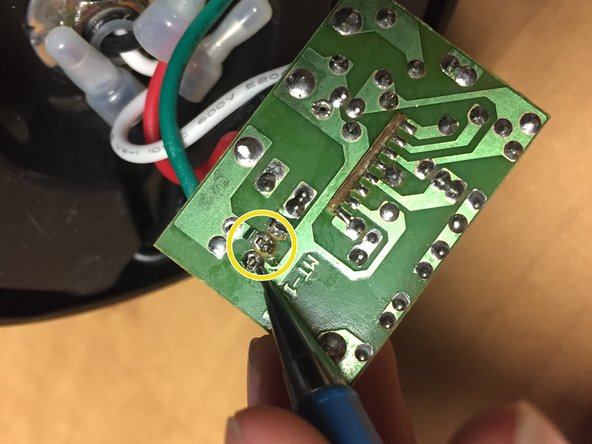
  • On the reverse side of the board, carefully desolder these three pins and remove the broken transistor.

  • Pay attention to the direction in which the new transistor is facing, Solder it in where the damaged one was removed. Ensure that no solder from each of the pins contact each other or any other component.

crwdns2935429:0crwdne2935429:0

crwdns2935429:0crwdne2935429:0

crwdns2935429:0crwdne2935429:0

crwdns2935429:0crwdne2935429:0

crwdns2935429:0crwdne2935429:0

crwdns2935429:0crwdne2935429:0

crwdns2944171:0crwdnd2944171:0crwdnd2944171:0crwdnd2944171:0crwdne2944171:0