crwdns2931529:0crwdnd2931529:0crwdnd2931529:0crwdnd2931529:08crwdnd2931529:0crwdne2931529:0
crwdns2935425:07crwdne2935425:0
crwdns2931653:07crwdne2931653:0

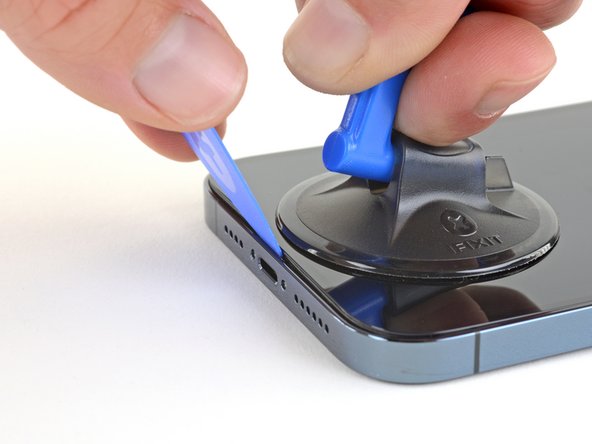


Lift the screen slightly
-
Pull up on the suction cup with firm, constant pressure to create a slight gap between the screen and the frame.
-
Insert an opening pick at a steep angle into the gap.
| [title] Lift the screen slightly | |
| [* black] Pull up on the suction cup with firm, constant pressure to create a slight gap between the screen and the frame. | |
| - | [* black] Insert an opening pick into the gap [https://guide-images.cdn.ifixit.com/igi/JRLPxnWrFi2XoeGy.full|under the screen's plastic bezel|new_window=true]. |
| - | [* icon_note] The watertight adhesive holding the screen in place is very strong; creating this initial gap takes a significant amount of force. If you're having a hard time opening a gap, apply more heat, and gently rock the screen up and down to weaken the adhesive until you create enough of a gap to insert your tool. |
| + | [* black] Insert an opening pick at a steep angle into the gap. |
| + | [* icon_caution] Make sure to insert the opening pick ***under the thick plastic bezel*** to avoid damaging your screen. You should see a visual gap, and the pick shouldn't catch on anything. If you can't see the gap, you'll need to pull the screen up more. |
| + | [* icon_note] The watertight adhesive holding the screen in place is very strong; creating this initial gap takes a significant amount of force. If you're having a hard time opening a gap, apply more heat, and gently rock the screen up and down to weaken the adhesive until you create enough of a gap to insert your tool. |
crwdns2944171:0crwdnd2944171:0crwdnd2944171:0crwdnd2944171:0crwdne2944171:0