crwdns2933423:0crwdne2933423:0

Sostituzione schermo Samsung Galaxy S20 Ultra

crwdns2936315:0crwdne2936315:0
crwdns2936321:0crwdne2936321:0
crwdns2931653:04crwdne2931653:0
Samsung Galaxy S20 Ultra Screen Replacement: crwdns2935265:00crwdnd2935265:01crwdnd2935265:03crwdne2935265:0 Samsung Galaxy S20 Ultra Screen Replacement: crwdns2935265:00crwdnd2935265:02crwdnd2935265:03crwdne2935265:0 Samsung Galaxy S20 Ultra Screen Replacement: crwdns2935265:00crwdnd2935265:03crwdnd2935265:03crwdne2935265:0
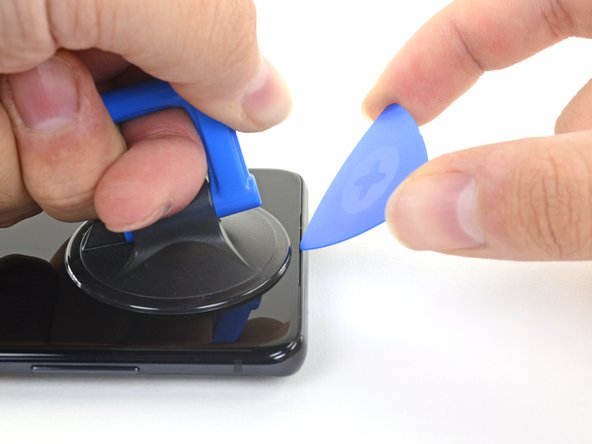
  • Apply a suction cup to the display glass, as close to the center of the top edge as possible.

  • If your display is badly cracked, covering it with a layer of clear packing tape may allow the suction cup to adhere. Alternatively, very strong tape may be used instead of the suction cup. If all else fails, you can superglue the suction cup to the broken screen.

  • Pull on the suction cup with strong, steady force to create a gap between the display glass and the frame.

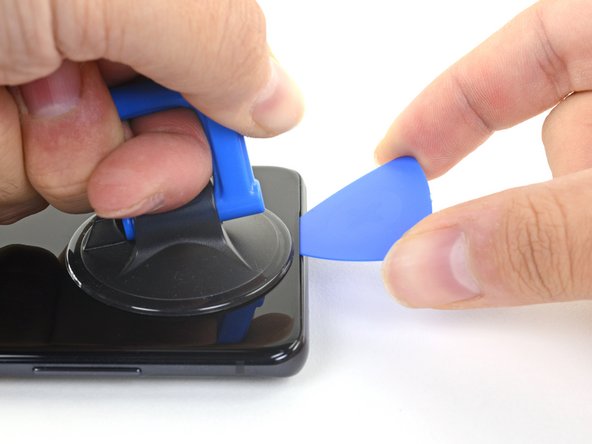
  • Insert the point of an opening pick into the gap in the center of the earpiece speaker notch, working it downwards underneath the display.

  • Ensure the pick slides over the front-facing camera and is not pushing against it.

  • Due to the stubborn adhesive, this may take multiple attempts of reheating with the iOpener and lifting with the suction cup before you get it right.

  • If you are having trouble creating a gap, apply more heat to the edge and try again.

  • Leave your pick in the seam to prevent the adhesive from reasealing.

Fai aderire una ventosa al vetro, il più vicino possibile al centro del bordo superiore.

Se il vetro è rotto, coprirlo con del nastro adesivo trasparente può far aderire meglio la ventosa. In alternativa, puoi usare del nastro adesivo resistente al posto della ventosa. Se niente ha funzionato, puoi incollare la ventosa al vetro rotto.

Tira la ventosa con forza costante per creare una fessura tra il vetro e la cornice.

Infila la punta di un plettro nella fessura al centro della capsula auricolare, spingendolo sotto lo schermo.

Assicurati che il plettro passi sopra la fotocamera anteriore e che non la spinga.

A causa dell'adesivo resistente, questo passaggio può richiedere più tentativi di riscaldamento con l'iOpener e separazione con la ventosa prima di riuscirci.

Se stai avendo problemi nel creare la fessura, scalda ulteriormente il bordo e riprova.

Lascia il tuo plettro nella fessura per evitare che l'adesivo si reincolli.

crwdns2944171:0crwdnd2944171:0crwdnd2944171:0crwdnd2944171:0crwdne2944171:0