crwdns2933423:0crwdne2933423:0

Remplacement de la carte mère du HTC Droid Eris

crwdns2931529:0crwdnd2931529:0crwdnd2931529:0crwdnd2931529:03crwdnd2931529:0crwdne2931529:0

crwdns2935425:03crwdne2935425:0

crwdns2936315:0crwdne2936315:0
crwdns2936317:0crwdne2936317:0
crwdns2931653:03crwdne2931653:0
HTC Droid Eris Motherboard Replacement: crwdns2935265:00crwdnd2935265:01crwdnd2935265:03crwdne2935265:0 HTC Droid Eris Motherboard Replacement: crwdns2935265:00crwdnd2935265:02crwdnd2935265:03crwdne2935265:0 HTC Droid Eris Motherboard Replacement: crwdns2935265:00crwdnd2935265:03crwdnd2935265:03crwdne2935265:0
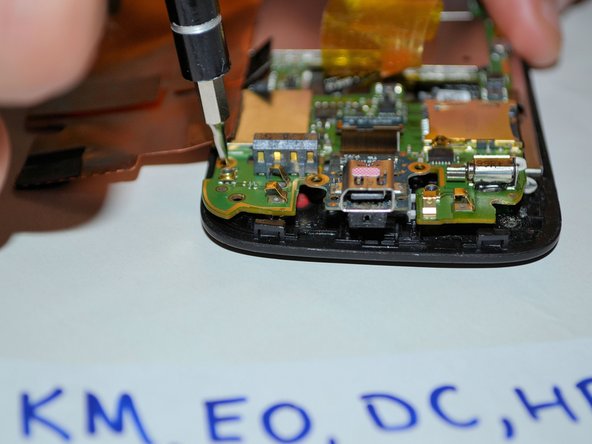
  • Unscrew the four 1.2mm Phillips screws with the Phillips #00 screwdriver from the motherboard.

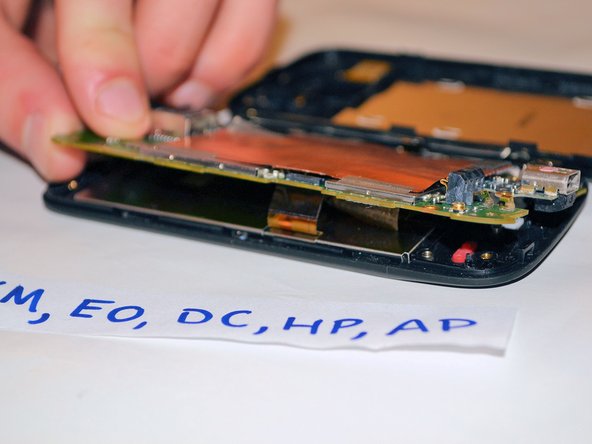
  • Place the four screws in a safe place and then carefully lift up and remove the motherboard, then set it aside.

  • Take a note of the moisture indicator located in the yellow rectangle on the bottom of the device in the second picture. If the moisture indicator is red then the device has water damage.

Dévissez les quatre vis cruciformes de 1,2 mm avec le tournevis cruciforme #00 de la carte mère.

Placez les quatre vis dans un endroit sûr, puis soulevez et retirez délicatement la carte mère, puis mettez-la de côté.

Notez l'indicateur d'humidité situé dans le rectangle jaune au bas de l'appareil sur la deuxième image. Si l'indicateur d'humidité est rouge, l'appareil est endommagé par l'eau.

crwdns2944171:0crwdnd2944171:0crwdnd2944171:0crwdnd2944171:0crwdne2944171:0