crwdns2933423:0crwdne2933423:0

Desmontaje de Jura Capresso IMPRESSA J5

crwdns2931529:0crwdnd2931529:0crwdnd2931529:0crwdnd2931529:02crwdnd2931529:0crwdne2931529:0

crwdns2936315:0crwdne2936315:0
crwdns2936331:0crwdne2936331:0
crwdns2931653:015crwdne2931653:0
Jura Capresso IMPRESSA J5 Teardown: crwdns2935265:00crwdnd2935265:01crwdnd2935265:03crwdne2935265:0 Jura Capresso IMPRESSA J5 Teardown: crwdns2935265:00crwdnd2935265:02crwdnd2935265:03crwdne2935265:0 Jura Capresso IMPRESSA J5 Teardown: crwdns2935265:00crwdnd2935265:03crwdnd2935265:03crwdne2935265:0
  • "Tamping Assembly"

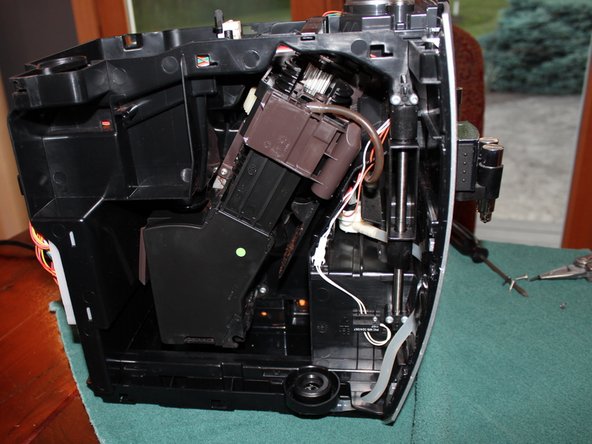
  • I call the black plastic diagonal assembly with the brown top the "tamping assembly". It receives the ground coffee, forms the puck, holds the puck while the water/steam goes through it, and then drops it in the waste tray (I presume).

  • Note If you choose to remove the tamping assembly you should carefully note where the brown portion is on the larger centre plastic screw. Maybe take a picture, or count exactly how many threads are above the brown portion.

  • When you reassemble, this it needs to be in the exact orientation it was in when you took it apart or it might break the machine. I realised it was a timing mechanism after having taken it apart and misaligned it. Luckily I had pictures to help get it back to the starting position.

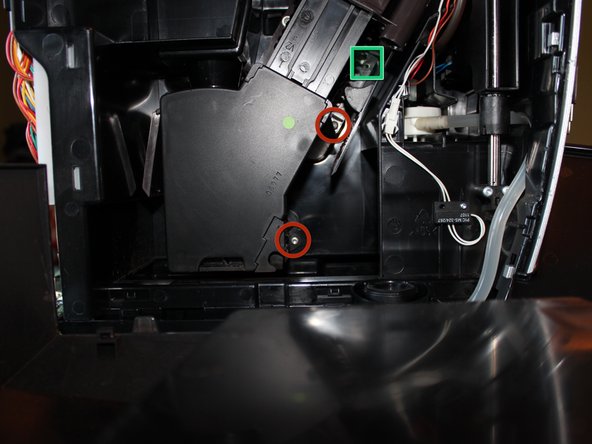
  • Remove the three T15 screws marked with the red circles. Top two are fine thread and bottom course thread. Note the screw marked with a blue sqaure does not need to be removed to remove the tamping assembly.

  • Also note the unused screw hole marked with a green square. You might need a long handled screw driver or an extension bit.

"Conjunto de apisonado"

Llamo "conjunto de apisonado" al conjunto diagonal de plástico negro con la parte superior marrón. Recibe el café molido, forma el disco, sostiene el disco mientras el agua/vapor pasa a través de él y luego lo deja caer en la bandeja de desechos (supongo).

Nota: si decides quitar el conjunto de apisonado, debes observar cuidadosamente dónde está la parte marrón en el tornillo de plástico central más grande. Tal vez puedas tomar una fotografía o contar exactamente cuántas roscas hay sobre la parte marrón.

Cuando vuelvas a ensamblarlo, debe estar en la orientación exacta en la que estaba cuando lo desarmaste o podrías romper la máquina. Me di cuenta de que era un mecanismo de sincronización después de haberlo desarmado y desalineado. Afortunadamente, tenía fotografías para ayudar a volver a la posición inicial.

Retira los tres tornillos T15 marcados con círculos rojos. Los dos superiores son de rosca fina y los inferiores de rosca gruesa. Ten en cuenta que no es necesario quitar el tornillo marcado con un cuadrado azul para quitar el conjunto de apisonado.

Observa también el orificio del tornillo sin usar marcado con un cuadrado verde. Es posible que necesites un destornillador con mango largo o una broca extensible.

crwdns2944171:0crwdnd2944171:0crwdnd2944171:0crwdnd2944171:0crwdne2944171:0