crwdns2933423:0crwdne2933423:0

Jura Impressa J5 Teardown

crwdns2931529:0crwdnd2931529:0crwdnd2931529:0crwdnd2931529:02crwdnd2931529:0crwdne2931529:0

crwdns2936315:0crwdne2936315:0
crwdns2936319:0crwdne2936319:0
crwdns2931653:015crwdne2931653:0
Jura Capresso IMPRESSA J5 Teardown: crwdns2935265:00crwdnd2935265:01crwdnd2935265:03crwdne2935265:0 Jura Capresso IMPRESSA J5 Teardown: crwdns2935265:00crwdnd2935265:02crwdnd2935265:03crwdne2935265:0 Jura Capresso IMPRESSA J5 Teardown: crwdns2935265:00crwdnd2935265:03crwdnd2935265:03crwdne2935265:0
  • "Tamping Assembly"

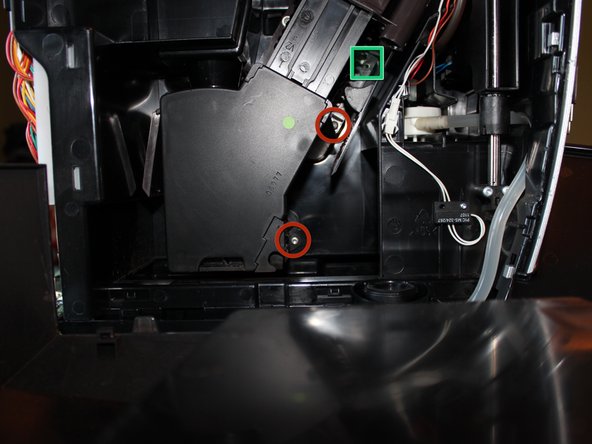
  • I call the black plastic diagonal assembly with the brown top the "tamping assembly". It receives the ground coffee, forms the puck, holds the puck while the water/steam goes through it, and then drops it in the waste tray (I presume).

  • Note If you choose to remove the tamping assembly you should carefully note where the brown portion is on the larger centre plastic screw. Maybe take a picture, or count exactly how many threads are above the brown portion.

  • When you reassemble, this it needs to be in the exact orientation it was in when you took it apart or it might break the machine. I realised it was a timing mechanism after having taken it apart and misaligned it. Luckily I had pictures to help get it back to the starting position.

  • Remove the three T15 screws marked with the red circles. Top two are fine thread and bottom course thread. Note the screw marked with a blue sqaure does not need to be removed to remove the tamping assembly.

  • Also note the unused screw hole marked with a green square. You might need a long handled screw driver or an extension bit.

Brüheinheit

Die Brüheinheit erhält das Kaffeemehl, formt den Puck, hält ihn fest, solange das heiße Wasser durchströmt und wirft den Trester aus.

Hinweis: Wenn du die Brühgruppe ausbauen willst, dann solltest du die merken, wo genau der braune Teil sich auf der großen Plastikschraube befindet. Mache ein Foto oder zähle, wie viele Gewindegänge überstehen.

Beim Zusammenbau sollte es in der gleichen Position wie beim Ausbau sein., Sonst könnten Schäden entstehen. Einmal fiel mir ein Problem mit dem Synchronisieren auf, als ich es nicht korrekt eingesetzt hatte. Zum Glück hatte ich ein Foto und konnte die Anfangsposition richtig einstellen.

Entferne die drei rot markierten Torx T15 Schrauben. Die oberen beiden haben ein feines Gewinde, die untere ein grobes. Beachte, dass die blau markierte Schraube nicht herausgedreht werden muss, um die Brühgruppe zu entfernen.

Beachte das grün markierte unbenutzte Schraubenloch. Für die anderen brauchst du einen Schraubendreher oder Bithalter mit langem Schaft.

crwdns2944171:0crwdnd2944171:0crwdnd2944171:0crwdnd2944171:0crwdne2944171:0