crwdns2933423:0crwdne2933423:0

Jura Capresso IMPRESSA J5 demontage

crwdns2931529:0crwdnd2931529:0crwdnd2931529:0crwdnd2931529:02crwdnd2931529:0crwdne2931529:0

crwdns2936315:0crwdne2936315:0
crwdns2936313:0crwdne2936313:0
crwdns2931653:07crwdne2931653:0
Jura Capresso IMPRESSA J5 Teardown: crwdns2935265:00crwdnd2935265:01crwdnd2935265:02crwdne2935265:0 Jura Capresso IMPRESSA J5 Teardown: crwdns2935265:00crwdnd2935265:02crwdnd2935265:02crwdne2935265:0
  • Beginning the Disassembly

  • I recommend performing this on top of an old towel, or something similar, to protect the coffee maker as well as the work surface and because some ground coffee tends to fall out of various crevices in the machine.

  • Remove: all four tray pieces (marked with red squares in the first photo), and the frothing attachment(s) (marked with a green circle in the first photo; you may have a second frothing attachment in the top storage area (blue circle, photo 2)).

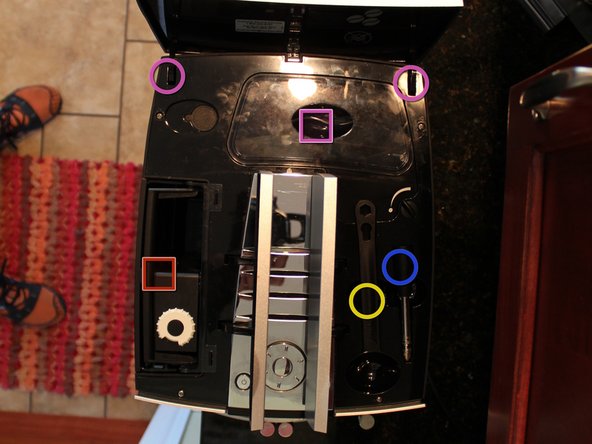
  • Remove: the water container (marked with a red square), the coffee scoop (yellow circle), and the coffee bean aroma preservation cover (pink square), all the unground beans from the hopper (you can gently dump them out after you have removed everything else by turning the machine over).

  • You can (optionally) remove the top back cover by gently wiggling each of the hinge points (marked with pink circles) up while it is open. Gentle pressure from side to side may release the hinges. Also loosen the captive screw on the bean area and then you can remove that grate by gently squeezing together the two hinge points.

  • [You can click on the photos to see them enlarged. Alternatively, 1. choose the orange cog wheel in the photo and choose 'Full Screen', or, 2. use Ctrl and + (incl =) in your browser to enlarge the whole page. Use Ctrl - to shrink.]

Begin de demontage.

Het is raadzaam om de demontage te doen op een oude droge doek of iets dergelijks. Dit beschermt de koffiemachine en de werktafel en vangt het eventuele koffiedrab valt uit de de J5 op.

Verwijder: alle vier de bakjes (aangegeven met rode vierkantjes op de eerste foto), en het opschuimhulpstuk (of de opschuimhulpstukken) (aangegeven met een groene cirkel op de eerste foto; er kan een tweede opschuimhulpstuk in het bovenste opbergvak zitten (blauwe cirkel, foto 2)).

Verwijder: het waterreservoir (gemarkeerd met een rood vierkant), de koffieschep (gele cirkel), en het deksel voor het bewaren van het koffiebonenaroma (roze vierkant), alle ongemalen bonen uit het reservoir (je kunt ze er voorzichtig uitgooien nadat je al het andere hebt verwijderd door de machine om te draaien).

U kunt de bovenste achterklep verwijderen door voorzichtig elk van de scharnierpunten (roze cirkels) omhoog te bewegen terwijl deze open is. Zachtjes van links naar rechts drukken kan de scharnieren losmaken. Draai de borgschroef op het bonengedeelte los dan kun je dat rooster verwijderen door de twee scharnierpunten voorzichtig samen te knijpen.

[Je kunt op de foto's klikken om ze vergroot te zien. Als alternatief, 1. kies het oranje tandwiel in de foto en kies 'Volledig scherm', of, 2. gebruik Ctrl en + (incl =) in je browser om de hele pagina te vergroten. Gebruik Ctrl - om te verkleinen].

crwdns2944171:0crwdnd2944171:0crwdnd2944171:0crwdnd2944171:0crwdne2944171:0